
How to add google maps store locator in WordPress unlocks a powerful way to showcase your business locations. This guide provides a comprehensive walkthrough, from setting up the Google Maps API to crafting a user-friendly interface. Learn how to display store details, customize the map’s appearance, and handle potential errors. It’s a valuable resource for anyone looking to enhance their WordPress site with a robust store locator.
We’ll cover everything from the foundational steps of integrating the Google Maps API to designing an intuitive user experience. Expect detailed explanations, practical examples, and helpful tips along the way. You’ll gain a solid understanding of the entire process, empowering you to create a high-quality store locator for your WordPress website.
Introduction to WordPress Store Locators
WordPress store locators are interactive maps integrated into websites, enabling users to find physical locations of businesses or services. These tools are particularly useful for retail businesses, restaurants, service providers, and other organizations with multiple physical locations. They provide a user-friendly way to navigate and locate specific stores, significantly enhancing customer experience and improving discoverability.Store locators are a valuable addition to any WordPress website, allowing customers to quickly pinpoint the nearest branch, saving them time and effort.
This functionality improves local and promotes brand awareness within the geographic area served. The various implementation methods and customization options available ensure compatibility with different website designs and functionalities.
Types of Store Locators
Different types of store locators cater to diverse needs. Basic locators simply display a map with marked store locations. Advanced locators might offer additional functionalities, such as driving directions, store hours, contact details, and even interactive features like online ordering or appointment scheduling. The choice of locator type depends on the specific business requirements and the level of interactivity desired.
Benefits of Using a Store Locator
Implementing a store locator on a WordPress website brings several advantages. It enhances user experience by enabling quick and easy location searches. This leads to improved customer satisfaction and potentially increased sales. Furthermore, a store locator aids in local search engine optimization (), boosting visibility within the local community. It also presents a significant opportunity for businesses to expand their reach, making it easier for customers to find them.
Implementation Methods
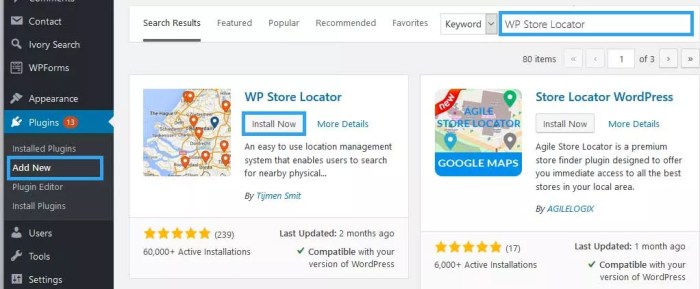
There are several ways to integrate a store locator into a WordPress website. One method involves using a plugin specifically designed for store locators. These plugins often offer various customization options, including map styles, marker icons, and user interface elements. Alternatively, developers can use third-party mapping APIs, such as Google Maps or Mapbox. This approach allows for greater control over the functionality and design but requires more technical expertise.
Another option is to utilize a combination of plugins and custom coding, leveraging the strengths of both approaches to tailor the store locator to specific business needs. This combination provides the most flexibility.
Adding a Google Maps store locator to your WordPress site is super handy for customers. Once you’ve got that sorted, you might also want to look into how to keep your users informed about their comments. Knowing how to notify users when their comment is approved in WordPress here is a great way to boost engagement and make sure everyone feels valued.
No matter which method you choose, making sure your site is user-friendly is key to a good experience. After all, a smooth and informative site is essential for a successful store locator.
Customization Options
Customization options for store locators vary significantly depending on the chosen implementation method. Plugins typically offer pre-configured settings to adjust map styles, markers, and other visual elements. Third-party APIs provide more granular control, allowing for intricate adjustments to map functionality and appearance. Custom coding can be used to integrate the store locator with existing website features or to add specific functionalities tailored to the business.
Customization options enable websites to match the locator’s design to the overall brand identity.
Integration with Other WordPress Features
Integrating a store locator with other WordPress features is possible and often beneficial. For example, the locator can be linked to a contact form, allowing customers to easily reach out to the relevant store. It can also be integrated with online ordering systems, providing a seamless experience for customers. This integration streamlines the customer journey, creating a more comprehensive and engaging experience.
Furthermore, the store locator can be linked to customer reviews or social media pages, providing more context and transparency.
Integrating Google Maps API
Getting your WordPress store locator to display interactive maps requires integrating the Google Maps JavaScript API. This involves fetching the necessary API resources, incorporating them into your theme or plugin, and handling API keys securely. This step is crucial for creating a user-friendly and visually appealing store locator.The Google Maps API provides the tools to dynamically display map elements, markers, and user-friendly interactions on your WordPress site.
By incorporating this API, your store locator will no longer be a static list of addresses but a dynamic, interactive map, enhancing user experience.
Obtaining and Implementing the Google Maps API
The Google Maps JavaScript API provides the functionality for displaying interactive maps. You must first obtain an API key from Google Cloud Platform. This key is essential for accessing the API’s services and should be treated as a sensitive piece of information.
Integrating the API with WordPress
To integrate the API into your WordPress theme or plugin, you’ll need to include the JavaScript library within your template file or plugin’s PHP code. This typically involves adding a ` ` tag referencing the Google Maps API. Properly integrating this script will ensure the map displays correctly and functions as expected.
Secure Handling of API Keys
Security is paramount when handling API keys. Never hardcode your API key directly into your WordPress theme or plugin files. Instead, use environment variables or a dedicated configuration file to store the key securely. This protects your API key from unauthorized access.
Code Examples for Incorporating the API
Here’s a basic example of incorporating the Google Maps API into a WordPress plugin:“`PHP <?php
// … other plugin code …
function my_google_maps_script()
$apiKey = get_option('google_maps_api_key'); // Retrieve from settings
if (!$apiKey)
echo 'Google Maps API key not found.';
return;
echo '’; // … rest of the script for map initialization …add_action(‘wp_footer’, ‘my_google_maps_script’);// … other plugin code …?>“`This code retrieves the API key from WordPress options and dynamically adds the API script to the footer. Crucially, it handles the case where the key isn’t found, preventing errors.
Error Handling
Implementing robust error handling is essential for a smooth user experience. Check for API errors and display user-friendly messages if something goes wrong. For example, if the API key is incorrect or if there’s a network issue, inform the user appropriately.
Essential Steps to Set Up the Google Maps API
| Step | Description |
|---|---|
| 1. Obtain an API Key | Request a Google Maps API key from Google Cloud Platform. |
| 2. Add API Key to WordPress | Store the API key securely, using WordPress options or a configuration file. |
| 3. Include API Script | Use the appropriate JavaScript “ tag referencing the Google Maps API. |
| 4. Initialize Map | Utilize JavaScript code to initiate the map and display markers. |
| 5. Handle Errors | Implement error handling to provide user-friendly feedback if issues arise. |
Data Structure for Store Locations
Storing store location data within a WordPress database requires a well-structured table to ensure efficient retrieval and management. This structure needs to be designed to accommodate various location details, and importantly, to integrate seamlessly with the Google Maps API. Proper data organization is critical for a user-friendly store locator and future scalability.
Table Schema Design
A dedicated table, named `wp_store_locations`, is ideal for organizing store information. This table will house all the necessary details for each location.
| Column Name | Data Type | Description |
|---|---|---|
| store_id | INT(11) AUTO_INCREMENT | Unique identifier for each store location. Primary key. |
| store_name | VARCHAR(255) | Name of the store. |
| address | VARCHAR(255) | Full address of the store location. |
| city | VARCHAR(255) | City where the store is located. |
| state | VARCHAR(100) | State or province of the store. |
| zip_code | VARCHAR(20) | Zip code or postal code. |
| country | VARCHAR(100) | Country where the store is located. |
| latitude | DECIMAL(10,8) | Latitude coordinate of the store location. |
| longitude | DECIMAL(11,8) | Longitude coordinate of the store location. |
| phone_number | VARCHAR(20) | Phone number for the store. |
| website_url | VARCHAR(255) | URL of the store’s website. |
| store_hours | TEXT | Store operating hours (e.g., “Monday: 9am-5pm”). |
| description | TEXT | Optional description of the store. |
Mapping to Google Maps API
The `latitude` and `longitude` columns are crucial for integration with the Google Maps API. These coordinates directly pinpoint the store’s location on the map. Ensure data accuracy in these fields to prevent display errors on the map. Data validation should be implemented to check for valid latitude and longitude values.
Data Integrity and Maintenance
Maintaining data integrity in the `wp_store_locations` table is essential for a functional store locator. Regular data validation, ensuring that addresses, coordinates, and other details are correct, is important. Using a validation plugin or custom PHP code can help. Importantly, a system for handling updates to store locations, such as address changes or new stores, should be in place.
Database Queries
Database queries are used to retrieve location data for display on the map. The following examples demonstrate how to query the `wp_store_locations` table.“`sql
– Retrieve all store locations
SELECT store_id, store_name, address, latitude, longitudeFROM wp_store_locations;
– Retrieve stores in a specific city
SELECT store_id, store_name, address, latitude, longitudeFROM wp_store_locationsWHERE city = ‘New York’;
- – Retrieve stores within a specific radius
- – (Requires a spatial extension for MySQL, like PostGIS)
SELECT store_id, store_name, address, latitude, longitudeFROM wp_store_locationsWHERE MBRContains( GeomFromText(‘POLYGON(( -0.01 -0.01, +0.01 -0.01, +0.01 +0.01, -0.01 +0.01, -0.01 -0.01))’), Point(latitude, longitude));“`These examples demonstrate basic queries; more complex queries might be needed for advanced filtering and sorting. Consider using parameterized queries to prevent SQL injection vulnerabilities.
Implementing the Store Locator Functionality: How To Add Google Maps Store Locator In WordPress
Bringing your store locations to life on a dynamic map is a crucial step in a user-friendly store locator. This section dives deep into the practical implementation, focusing on fetching data, updating the map on user interaction, handling different map types, and customizing markers for each store. We’ll use WordPress custom functions to ensure seamless integration with your existing website.Implementing the store locator involves several crucial steps, from data retrieval to marker customization.
The goal is to create an interactive map that accurately reflects your store locations and allows users to easily find the nearest stores. This detailed approach ensures that the map responds effectively to user actions, such as zooming or changing map types.
Fetching and Displaying Store Location Data
Retrieving and presenting your store location data is the first crucial step in implementing the store locator. This involves using WordPress custom functions to query your database, which contains the store details.“`php// Example custom function to fetch store locationsfunction get_store_locations() $locations = get_posts(array( ‘post_type’ => ‘store_locations’, // Assuming a custom post type ‘posts_per_page’ => -1 )); $store_data = array(); foreach ($locations as $location) $store_data[] = array( ‘name’ => get_the_title($location->ID), ‘address’ => get_post_meta($location->ID, ‘store_address’, true), ‘latitude’ => get_post_meta($location->ID, ‘store_latitude’, true), ‘longitude’ => get_post_meta($location->ID, ‘store_longitude’, true), ); return $store_data;“`This function, `get_store_locations()`, queries a custom post type called `store_locations`.
It extracts crucial information like store names, addresses, and GPS coordinates, stored as custom fields. The returned data is formatted for easy use with the Google Maps API.
Dynamically Updating the Map, How to add google maps store locator in wordpress
The map needs to respond in real-time to user interactions, like zooming and panning. This dynamic updating is achieved using JavaScript event listeners that trigger map updates based on the user’s actions. This ensures a smooth and responsive user experience.
Handling Different Map Types and Zoom Levels
The map should offer a variety of map types (e.g., satellite, terrain) to cater to user preferences. Zoom levels should be adjustable to suit the scale of the displayed area. This is implemented using the Google Maps API’s controls.
Adding Markers to the Map
For each store location, a marker is placed on the map. This visual representation of the store is critical for easy identification.“`javascript// Example JavaScript code for adding markersfunction addMarkers(locations) locations.forEach(location => const marker = new google.maps.Marker( position: lat: parseFloat(location.latitude), lng: parseFloat(location.longitude) , map: map, title: location.name, icon: ‘https://example.com/marker.png’ // Example marker icon ); // Add a click event listener to the marker marker.addListener(‘click’, function() infowindow.open(map, marker); ); );“`This JavaScript code iterates through the store locations, creating a marker for each.
It uses the latitude and longitude to position the marker on the map and adds a title for the user interface.
Marker Customization Options
Markers can be customized with different icons, colors, and shapes to provide visual distinction and improve user experience.
- Icon Customization: Use custom icons to represent different store types or categories.
- Color Customization: Adjust marker colors to match your branding or highlight specific stores.
- Marker Size: Change the size of the markers to accommodate different map zoom levels.
These customization options enhance the visual appeal and functionality of the store locator, improving user experience.
Displaying Store Details
Adding interactive elements to your store locator is crucial for user engagement. Users need a clear and concise way to view store specifics, like addresses, hours, and contact information. This section details how to create informative pop-ups or infoboxes when a user clicks on a marker on the map, enhancing the user experience.
Displaying Store Information in Pop-ups
Pop-up windows, or infoboxes, are an effective way to display store details when a marker is clicked. They provide a focused area for presenting information without cluttering the main map view. The design should be clean and easily navigable. These windows can contain vital store information such as addresses, phone numbers, opening hours, and even a link to their website.
Integrating Additional Store Information
Beyond basic details, consider adding visual elements to the pop-up windows. For instance, including a high-quality image of the store, a short description, or even a small gallery of photos can significantly improve the user experience. This can be combined with a brief product listing, making the locator even more useful.
Responsive Table for Detailed Store Information
A responsive table is a structured way to present multiple store details simultaneously. This can be particularly helpful when users need a quick overview of several stores.
| Store Name | Address | Phone Number | Opening Hours | Image |
|---|---|---|---|---|
| Store A | 123 Main Street, Anytown, CA 91234 | (555) 123-4567 | Mon-Fri: 9am-5pm, Sat: 10am-2pm |  |
| Store B | 456 Oak Avenue, Anytown, CA 91234 | (555) 987-6543 | Mon-Sat: 10am-6pm |  |
The table structure allows for a clear layout of store information, facilitating easy comparison between different stores. Each store’s details are neatly organized into columns for a streamlined user experience. The use of placeholder images demonstrates how images can be incorporated into the table format.
User Interface and User Experience
A well-designed store locator is crucial for a positive user experience. It needs to be intuitive, allowing customers to quickly and easily find the nearest stores. Poorly implemented interfaces can lead to frustration and lost sales. This section dives into best practices for creating a smooth and efficient store locator experience.
Intuitive Interface Design
A user-friendly interface is paramount. Clear labeling, concise descriptions, and logical navigation are essential. Use consistent design elements across the entire store locator to maintain a cohesive visual identity. Avoid overwhelming users with too much information at once; break down complex tasks into smaller, manageable steps. Employ visual cues, such as highlighting or color-coding, to guide users through the search process.
Adding a Google Maps store locator to your WordPress site is a great way to showcase your locations. However, with Google Analytics discontinuing store visits reporting, google analytics discontinues store visits reporting , you’ll need to find alternative ways to track foot traffic. Fortunately, many plugins offer robust store locator functionality, making it easier than ever to add these interactive maps to your site, helping customers find your physical stores easily.
Optimizing Map Loading Speed
Fast map loading times are critical. Large datasets can significantly slow down the interface, leading to poor user experience. Implement techniques like asynchronous loading, optimizing image sizes, and utilizing efficient data structures. Consider using a tile-based map rendering system to load map data incrementally, only loading the parts of the map visible to the user. Caching map tiles can also improve loading speed.

Handling Diverse Screen Sizes and Devices
The store locator should adapt seamlessly to different screen sizes and devices. Responsive design principles are crucial for ensuring a consistent experience on desktops, tablets, and mobile phones. Utilize media queries to adjust layout and content based on screen width. Ensure that all interactive elements, such as buttons and search fields, are easily accessible and usable on touchscreens.
Figuring out how to add a Google Maps store locator to your WordPress site can be a game-changer for local businesses. Understanding the technical aspects is crucial, but equally important is building a strong online presence, which ties into the 5 essential components of a visible expert toolkit. This includes crafting compelling content, engaging with your audience, and establishing yourself as a trustworthy source of information.
After all, a user-friendly store locator is useless without a platform that showcases your expertise, as discussed in depth in the 5 essential components of a visible expert toolkit. Ultimately, a well-integrated Google Maps store locator is just one part of a successful online strategy, so you can focus on the core elements of building a robust online presence for your business.
Clear Call-to-Actions
Clear and prominent call-to-actions are essential for guiding user interactions. Use visually distinct buttons or links with clear text that indicates the next steps. For instance, if a user has found a store, a “Get Directions” button will be crucial for user engagement. Ensure these call-to-actions are easily accessible and visible on all screen sizes.
UI Element Functionality Table
| UI Element | Functionality |
|---|---|
| Search Bar | Allows users to input store names, addresses, or s to find stores. |
| Map | Visual representation of store locations. Allows users to zoom and pan to view stores. |
| Store Markers | Visual indicators on the map that pinpoint store locations. |
| Store Details Panel | Displays information about a selected store, such as address, phone number, hours, and directions. |
| Filtering Options | Enables users to refine their search based on specific criteria (e.g., store type, opening hours). |
| Directions Button | Provides navigation instructions from the user’s current location to the selected store. |
| Zoom Controls | Allows users to adjust the magnification level of the map. |
| Pan Controls | Allows users to move the map around. |
| “View Larger Map” | Opens a larger, more detailed map view of the selected area. |
Customizing the Appearance
Now that you’ve integrated Google Maps and populated your store locator with data, it’s time to tailor the map’s visual presentation to match your brand and website aesthetics. Customizing colors, markers, styles, and even the map’s zoom level will create a more polished and user-friendly experience. This section will guide you through adjusting the visual elements for a professional and engaging store locator.
Map Styles
Google Maps offers a variety of pre-defined styles, from classic to modern. Selecting a suitable style is a crucial step in matching the map’s visual presentation with your overall brand identity. Applying a style significantly impacts the user experience, enhancing the aesthetic appeal and creating a cohesive visual theme. Different styles evoke various moods and cater to specific design preferences.
- Classic Style: This style is a default map style. It’s generally familiar and easy to understand, offering a simple and straightforward map interface.
- Satellite Style: This style shows a satellite view of the map, highlighting the geographical context of the store locations. It can be valuable for users who need a clear understanding of the physical location.
- Terrain Style: This style focuses on the elevation and terrain of the map, which can be beneficial for outdoor stores or businesses needing to showcase the surrounding landscape.
Marker Customization
Markers are essential for visually representing each store location on the map. Customizing marker images and colors enhances brand recognition and user engagement. The visual representation of each store location directly influences user comprehension and navigation.
- Icon Images: Instead of the default marker, you can use custom images. This is a powerful way to integrate your branding. For example, a clothing store might use a stylized image of a clothing rack as a marker, while a bakery could use a small image of a pastry. The key is to maintain consistency with your overall branding.
- Color Variations: Modifying the marker’s color can highlight specific categories or promotions. A restaurant with a new lunch special could use a bright yellow marker, while a store offering a loyalty program could use a distinctive blue marker.
Adjusting Zoom Level and Center Point
Controlling the initial zoom level and center point of the map ensures that the map is conveniently displayed for users. The default settings might not always be ideal, requiring adjustments for optimal visibility and usability.
- Initial Zoom Level: The initial zoom level determines how much detail is visible on the map at the start. A lower zoom level shows a broader area, while a higher zoom level focuses on a specific region. A good starting point might be a level that encompasses all your store locations.
- Center Point: The center point of the map should be strategically placed to ensure that the majority of your store locations are visible without requiring excessive scrolling. You could center the map on a major city or area that contains the most stores.
Adding a Search Bar or Filter
Implementing a search bar or filter allows users to easily find the store they’re looking for. This feature is particularly useful when dealing with a large number of store locations, providing a user-friendly interface for searching store locations.
- Search Bar Functionality: A search bar enables users to type in a store name, address, or city, and the map will dynamically zoom and center on the relevant location. This allows for faster navigation within the map.
- Filter Options: Adding filters lets users refine their search based on criteria like store type, product categories, or operating hours. For instance, a user might want to find all coffee shops within a 10-mile radius, providing specific criteria for searching and filtering the locations.
Error Handling and Maintenance
Building a robust store locator requires anticipating potential issues and implementing solutions to ensure smooth operation. This section details strategies for handling errors during map loading, data retrieval, and user interaction. Effective error handling significantly enhances the user experience by preventing frustration and ensuring the store locator remains a valuable tool. Maintaining the locator’s functionality through regular updates and maintenance is equally crucial.Thorough error handling is essential for a positive user experience.
Unexpected problems, such as network issues or database errors, can severely impact the usability of the store locator. Implementing robust error handling mechanisms, along with regular maintenance and updates, minimizes these disruptions.
Potential Errors and Their Solutions
Addressing potential errors proactively is key to a smooth user experience. Network connectivity problems, API limitations, or issues with the data source can lead to map loading failures or inaccurate store listings. The store locator should gracefully handle these issues, providing informative messages and preventing application crashes.
- Network Connectivity Errors: Implement checks to detect network connectivity problems. If the user’s internet connection is lost during map loading, display a clear message informing them about the issue and suggesting they try again. Implement a retry mechanism with a suitable delay.
- Data Retrieval Errors: Include error handling for database queries or API calls. If a query fails, display a user-friendly message. Log the error for debugging purposes. Consider using caching mechanisms to improve performance and reduce the frequency of database queries.
- API Limitations: Google Maps API has rate limits and error codes. Implement checks for these codes. Handle exceeding the API rate limit by implementing appropriate delays. Consider using a queuing system for handling high-volume requests to prevent overwhelming the API.
Debugging Techniques
Effective debugging is critical for identifying and resolving errors quickly. Logging errors, using browser developer tools, and employing a structured debugging process can help.
- Logging Errors: Use a robust logging system to capture errors, including timestamps, error messages, and relevant data. Store these logs in a centralized location to facilitate analysis. This is crucial for diagnosing problems, and often helps identify trends in errors.
- Browser Developer Tools: Utilize browser developer tools (e.g., Chrome DevTools) to inspect network requests, identify errors, and monitor the performance of the store locator. This can help understand why certain requests are failing and pinpoint the source of the error.
- Structured Debugging: Establish a clear debugging process. Isolate the affected code sections, test individual components, and progressively add code elements to identify the source of the error. Consider using logging and breakpoints for better understanding of program flow and variables.
Importance of Regular Maintenance
Regular maintenance and updates are crucial to ensure the store locator remains functional, accurate, and secure. This includes checking for and fixing bugs, updating dependencies, and regularly refreshing the data source. Keeping the data current and accurate ensures the locator remains a reliable tool for users.
- Data Updates: Establish a schedule for updating the store location data. This ensures the information presented to users remains accurate and up-to-date.
- Security Updates: Regularly check for and apply security updates to the WordPress plugin or theme to address vulnerabilities and prevent potential attacks.
- Dependency Updates: Keep all dependencies (libraries, plugins, etc.) updated to benefit from bug fixes, security improvements, and performance enhancements. A well-maintained system is a secure system.
Implementing Automatic Updates
Implementing automatic updates to the store locator ensures that the application remains functional and secure. This can significantly reduce the effort required for maintaining the application.
- Plugin Updates: Configure the plugin to automatically update itself when new versions become available. Many WordPress plugins offer this feature. Ensure the update process is reliable to minimize downtime.
- Theme Updates: Similarly, ensure your WordPress theme is updated regularly. Themes often contain critical security patches and performance improvements.
Final Thoughts
In conclusion, adding a Google Maps store locator to your WordPress site is a powerful way to enhance your online presence and make it easier for customers to find your stores. By following the steps Artikeld in this guide, you can create a seamless and visually appealing store locator. Remember to prioritize user experience and customize the appearance to match your brand.
This detailed walkthrough will guide you through the entire process, ensuring a successful implementation.