
How to properly add images in WordPress sets the stage for mastering visual storytelling on your website. This guide will walk you through everything from basic uploads to advanced image manipulation, optimization, and security. Learn how to seamlessly integrate stunning visuals into your WordPress posts and pages, ensuring optimal performance and a polished user experience.
From selecting the perfect image to inserting it seamlessly into your content, this comprehensive guide covers every step. We’ll explore different methods, optimization techniques, and formatting strategies to help you create visually appealing and high-performing WordPress sites. Mastering these techniques will elevate your content and engage your audience.
Introduction to WordPress Image Uploads
Adding images to your WordPress website is crucial for engaging content. Images break up text, illustrate concepts, and make your site visually appealing. This process, while straightforward, involves a few key steps.The fundamental method involves uploading images from your computer and then inserting them into your posts or pages. WordPress provides a user-friendly interface to manage these images, allowing you to control their placement and appearance.
Understanding these steps ensures your website’s visual appeal and accessibility.
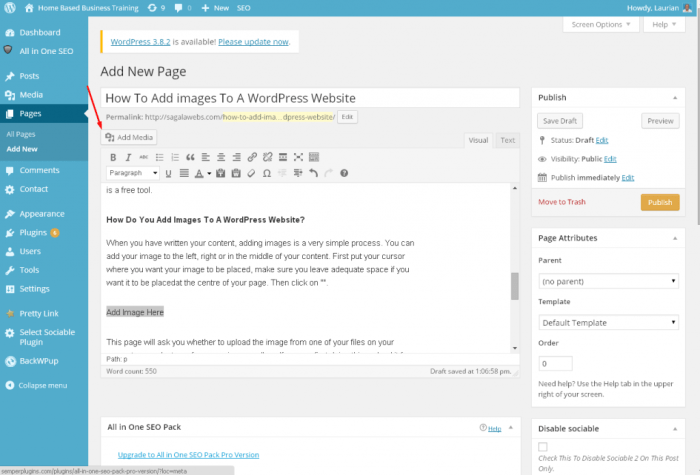
Basic Image Upload Process
The image upload process in WordPress is relatively simple. First, you need to navigate to the area where you intend to add the image (e.g., a post or page). Once you’re in the editing view, you’ll usually find a dedicated “Add Media” or “Insert from Media Library” button. Clicking this button will open a window where you can choose the image you want to upload from your computer.
Figuring out how to properly add images in WordPress can be tricky, but it’s crucial for engaging content. Knowing the correct image dimensions and alt text is important, but did you know that broken links on your site can hurt your SEO? Check out the complete guide to broken link building for a deep dive into fixing those pesky dead links, which in turn, can help your image optimization strategy.
Once you’ve got your broken links under control, you can focus on making sure your images are correctly sized and optimized for your WordPress site.
Selecting and Inserting Images
After clicking “Add Media,” a window will appear. Locate the image file on your computer and select it. WordPress will then upload the image to your server. You can also resize the image within the window before inserting it into your content. Use the available tools to adjust the image’s size and position.
Once satisfied with the adjustments, click the “Insert into Post” button. This action will place the image in the designated area of your post or page.
Organizing Images in the Media Library
WordPress maintains a central repository for all uploaded images, known as the Media Library. This library allows you to organize your images by creating folders. This is an essential practice for maintaining a well-structured website. It makes it easier to locate and reuse images in the future. By categorizing images using folders, you can improve the efficiency of finding specific images for use in various posts and pages.
Image Optimization for Performance
Optimizing images is crucial for website performance. Large image files can significantly slow down your website. Compressing images without compromising quality reduces their file size. This leads to faster loading times and a more positive user experience. Use image optimization plugins or tools to resize and compress your images to improve site speed.
Consider the file size of the images and their dimensions to minimize loading times and enhance user engagement.
Methods for Image Insertion
 in 2025")
WordPress makes it surprisingly easy to add images to your posts and pages. This flexibility is crucial for creating engaging and visually appealing content. Different methods cater to various needs, from simple uploads to complex integration with plugins. Understanding these methods allows you to optimize your workflow and enhance your site’s visual appeal.Choosing the right method depends on the source of your image and how you want it to appear in your content.
Whether you’re using a pre-existing image from your computer, a file from your server, or an image hosted online, WordPress provides multiple avenues for integration. This guide explores several options, ensuring you can seamlessly incorporate visuals into your WordPress projects.
Using the WordPress Image Uploader
The built-in WordPress image uploader is a straightforward method for adding images to your site. It’s a user-friendly interface that allows you to select an image from your computer and upload it directly to your WordPress media library. This method is ideal for images stored locally on your computer or device.
Inserting Images from the Media Library
Once an image is uploaded, you can easily insert it into your post or page using the “Insert from Media Library” feature. This feature simplifies the process of placing images within your content. This method is crucial for efficiently using images already saved within your WordPress media library. Finding the image you need is simplified by the library’s organizational structure, enabling efficient retrieval and placement within your content.
Inserting Images Directly from a URL
You can also insert images from external websites by pasting the image’s URL directly into your post editor. This method is particularly useful when you need to include an image from another site or a hosting platform. Ensure the image is accessible and publicly available. For example, using an image hosted on Unsplash or Pexels is a quick way to add visuals.
Using Shortcodes for Image Insertion
WordPress shortcodes offer a more flexible and structured approach to image insertion. They allow you to control various aspects of the image’s display, such as size and alignment. This approach is especially helpful for creating consistent visual formatting across multiple posts or pages. They provide a way to embed images without directly working with the Media Library, which is useful for developers.
Example: `[img src=”your-image-url” alt=”your-image-alt-text”]`
Comparison of Image Insertion Methods
| Method | Description | Pros | Cons |
|---|---|---|---|
| WordPress Image Uploader | Upload images directly from your computer. | Easy to use, intuitive interface. | Requires image to be on your local system. |
| Insert from Media Library | Select pre-uploaded images from the library. | Efficient for already uploaded images, quick insertion. | Requires image to already exist in the library. |
| Insert from URL | Paste image URL directly into the editor. | Can insert images from external sources, quick. | Reliance on external servers, potential issues with broken links. |
| Shortcodes | Use shortcodes for structured image insertion. | Flexibility in sizing, alignment, and other image attributes, useful for themes. | Requires understanding of shortcode syntax, slightly more complex. |
Image Alignment and Positioning
Mastering image alignment is crucial for creating visually appealing and user-friendly WordPress websites. Properly aligning images enhances the overall layout, improves readability, and guides the reader’s eye through the content. This section delves into the various alignment options available within the WordPress editor and how to leverage CSS for more advanced styling.
Image Alignment Controls in the WordPress Editor
WordPress provides intuitive controls for aligning images directly within the editor. These controls are easily accessible when you upload or insert an image. You’ll find options to align images to the left, right, center, or even stretch them across the entire width of the content area (full-width).
Impact of Image Alignment on Layout and Readability
The alignment of images significantly impacts the visual flow and readability of your content. Left-aligned images can create a more traditional, text-heavy layout, while right-aligned images can add visual interest and break up large blocks of text. Centered images draw attention to specific elements, while full-width images can be used for impactful hero sections or visually dominant content.
Using CSS Classes to Style Images
While WordPress’s built-in alignment options are sufficient for basic needs, using CSS classes allows for greater control over the visual presentation of your images. This is particularly useful for consistent styling across multiple images and for creating unique visual effects. CSS classes provide a way to target specific images and apply custom styles, including padding, margins, width, and height, without affecting other elements on the page.
Examples of Different Image Alignment Styles
Here are examples of how different alignment styles can enhance the visual appeal and readability of your WordPress content:
| Alignment Option | Visual Example | Code Snippet (HTML) | Code Snippet (CSS) |
|---|---|---|---|
| Left Alignment | An image positioned on the left side of the text, allowing text to wrap around it. |
|
|
| Right Alignment | An image positioned on the right side of the text, allowing text to wrap around it. |
Some text that flows around the image. |
|
| Center Alignment | An image positioned in the center of the page. |
|
|
| Full-Width Alignment | An image that spans the entire width of the content area. |  |
Advanced Image Manipulation and Settings

Mastering image manipulation within WordPress empowers you to optimize images for various display purposes. Beyond basic insertion, advanced techniques allow for precise control over image size, format, and placement, ultimately enhancing your website’s visual appeal and performance. This section dives deep into the available tools and strategies for refining your image workflow.WordPress provides a comprehensive suite of tools to fine-tune images, ensuring optimal display across different devices and screen sizes.
These techniques ensure images are not only visually appealing but also load quickly, contributing to a positive user experience.
Image Editing Tools
WordPress’s built-in image editor offers intuitive controls for resizing, cropping, and rotating images. This straightforward interface makes complex adjustments accessible to users of all skill levels. Using the editor directly within the Media Library simplifies the process of manipulating images without needing external software.
Resizing, Cropping, and Rotating Images, How to properly add images in wordpress
The WordPress image editor provides versatile tools for adjusting image dimensions. Resizing is crucial for maintaining optimal image quality while adhering to website design specifications. Cropping allows you to isolate specific portions of an image, focusing on the desired elements. Rotation corrects any image misalignment, ensuring proper orientation. These adjustments ensure that images are presented in a visually appealing and consistent manner across your website.
Media Library Management
The Media Library serves as a central repository for all uploaded images. Efficient organization within the library is key to maintaining a streamlined workflow. This crucial feature enables you to quickly locate and manage your images.
Organizing and Categorizing Images
Effective image organization within the Media Library is essential for seamless content management. Creating folders or categories helps to group similar images, enabling quick retrieval. This structured approach promotes a well-organized workflow, crucial for managing a large number of images. Using descriptive filenames further enhances searchability and organization.
Creating Image Galleries
WordPress’s gallery feature simplifies the process of presenting multiple images in a cohesive manner. These galleries can be easily embedded into posts or pages, showcasing a series of related images. By adding appropriate captions, you can enhance the informational value of the gallery. This technique is particularly useful for showcasing product images, portfolios, or photo essays.
Setting Image Sizes
Defining different image sizes is critical for optimal display on various parts of your website. This process ensures that images load quickly and adapt to different screen resolutions. Customizing sizes for thumbnails, medium, and large images provides versatility for visual presentation.
Image Sizes Table
| Image Size | Width | Height | Description |
|---|---|---|---|
| Thumbnail | 150px | 150px | Small preview image |
| Medium | 300px | 300px | Standard-sized image |
| Large | 600px | 600px | Larger image for detailed views |
Troubleshooting Common Issues
Adding images to WordPress can sometimes be tricky. There are various potential problems, from images not displaying to alignment issues and even plugin conflicts. This section will cover common pitfalls and their solutions, helping you troubleshoot effectively and get your images looking their best.Understanding the potential sources of problems is crucial to effective troubleshooting. WordPress, like any software, has its limitations and can sometimes misinterpret image data or encounter conflicts with other components.
Knowing how to diagnose and resolve these issues saves you time and frustration.
Image Not Displaying
Often, the first sign of trouble is that an image simply won’t appear. This can stem from several causes, including incorrect file paths, permissions issues, or problems with the image itself. Checking the image file for any corruption or issues in its format is vital. Verify that the file path is correctly entered, and ensure the file has the appropriate permissions to be accessed.
A simple typo in the file name or URL can also prevent the image from showing up.
Incorrect Image Sizes or Alignment
WordPress offers various options for image sizes and alignment. If an image appears in an unexpected size or position, it might indicate a problem with these settings. Double-check the image dimensions, cropping settings, and alignment choices used when uploading or inserting the image. Incorrect sizing can result in distorted or improperly scaled images, while incorrect alignment can cause the image to appear out of place within the content.

Ensuring consistency in sizing and alignment is important for a clean and professional look.
Knowing how to properly add images in WordPress is crucial, especially when building a strong online presence. High-quality visuals are key to grabbing attention, but it’s not just about slapping images onto your site. For professional services firms, showcasing expertise and credibility through compelling imagery is vital to brand building, which is why focusing on your firm’s image is paramount.
Brand building for professional services firms often involves understanding the nuances of visual storytelling. Ultimately, the right image placement and alt text optimization in WordPress are essential for both a visually appealing website and good SEO.
Image URL Errors
Incorrect or broken image URLs are a frequent source of display problems. Carefully review the image URL, ensuring that it’s accurately reflecting the location of the image file on your server. A misplaced or missing character can lead to a broken image link. Double-check for any typos or formatting errors, and ensure that the file is accessible from the given path.
Verify that the URL is pointing to the correct file and that the file has the necessary permissions.
Plugin Conflicts
Plugins, while enhancing WordPress functionality, can sometimes interfere with image insertion processes. If an image upload or display problem arises after installing a new plugin, the plugin might be causing the issue. Check for compatibility issues between the plugin and your theme or other plugins. In some cases, disabling the suspect plugin temporarily can help isolate the problem.
Optimizing image placement in WordPress is key for a better user experience, but also for search engine visibility. Think about how you can use alt text and file names to improve your site’s SEO. To boost your image optimization, consider adapting your SEO strategy to leverage the power of AI tools, like those suggested in this excellent guide on adapt seo strategy stronger ai visibility.
By following these tips, you can significantly improve your image integration and website performance.
Disabling and re-enabling plugins one at a time can pinpoint the conflicting plugin.
Image Upload Errors and Solutions
Troubleshooting image upload errors requires careful examination of the specific error messages. These errors can range from file size limitations to permission problems. Here’s a table outlining common upload errors and their solutions:
| Error | Description | Possible Causes | Solutions |
|---|---|---|---|
| File too large | WordPress restricts file size. | Image file exceeds allowed size. | Resize the image using image editing software. |
| Invalid file type | Unsupported file format. | Image is not in a supported format (e.g., .jpg, .png, .gif). | Convert the image to a supported format. |
| Permission denied | Server lacks access rights. | Insufficient permissions to upload to the designated directory. | Check file permissions and server configurations. Contact your hosting provider if needed. |
| Upload failed | General upload error. | Server issues, network problems, or temporary glitches. | Check server logs for details, retry upload, or contact hosting provider. |
Image Security and Best Practices: How To Properly Add Images In WordPress
Protecting your WordPress images is crucial, not just for aesthetics, but also for website security and user trust. Malicious code embedded within images can compromise your entire site, leading to data breaches and reputational damage. Implementing robust security measures ensures your images are safe and your site remains protected.Secure file storage is a cornerstone of image security. By employing secure storage practices, you safeguard against unauthorized access and potential data breaches.
This is paramount, especially when dealing with sensitive user data or confidential information.
Secure File Storage
Proper storage methods are critical to protect images. Utilizing secure file storage solutions, such as cloud storage with robust access controls, limits unauthorized access to your image files. This proactive measure significantly reduces the risk of compromise. Additionally, storing images in a dedicated, secure directory on your server with restricted permissions can be beneficial. These measures prevent accidental or malicious access.
Preventing Malicious Code
Preventing malicious code from being embedded in images is a vital part of overall WordPress security. Regularly scanning images for malicious code using dedicated security tools is essential. Image validation and filtering are crucial to ensure that only safe images are uploaded. This approach safeguards against malicious scripts or exploits disguised as harmless images.
User Upload Handling
User-uploaded images require specific security considerations. Implementing robust input validation and sanitization processes on user uploads is critical to prevent malicious code injection. This validation checks that the file format, size, and content are safe. Restricting file types to only allowed extensions, like .jpg, .png, or .gif, helps prevent uploading harmful file types.
Using Plugins for Image Security
Employing plugins specifically designed for image security can significantly enhance your WordPress site’s defenses. These plugins often offer features like automatic scanning for malicious code, content filtering, and enhanced validation. Such plugins automate many security checks and streamline the process. Examples of plugins can include those that scan images for malicious code, those that restrict file types, and those that offer image sanitization.
Best Security Practices
To prevent vulnerabilities and attacks, follow these crucial security practices:
- Regularly update WordPress, plugins, and themes to patch security vulnerabilities.
- Employ strong passwords for your WordPress administrator account and limit access to only authorized personnel.
- Enable two-factor authentication for added security layers.
- Use a reputable and regularly updated security plugin for WordPress.
- Configure appropriate file permissions on your server to restrict access to image files.
- Implement robust input validation and sanitization to prevent malicious code injection from user uploads.
- Utilize image scanning tools to detect malicious code embedded within images.
These practices provide a strong defense against potential threats.
Final Summary
In conclusion, adding images effectively in WordPress is crucial for creating engaging and visually appealing content. This guide has provided a thorough overview of the process, from initial uploads to advanced manipulation and security best practices. By understanding these techniques, you can ensure your images enhance your website’s performance and user experience. Remember to optimize your images for speed and security to maximize the impact of your visuals.