How to hide featured images on individual posts in WordPress is a crucial skill for website customization. Sometimes, you might want to tailor the look of specific posts by removing the featured image. This guide explores various methods for achieving this, from simple CSS tweaks to advanced plugin integration, catering to different technical skill levels.
This comprehensive guide will walk you through the steps to hide featured images on individual WordPress posts, considering different scenarios and various technical approaches. We’ll cover using plugins, custom CSS, and theme options, ensuring you can effectively control the display of featured images.
Introduction to Hiding Featured Images
Sometimes, the default WordPress featured image placement just isn’t ideal for every post. You might want more control over the visual presentation of your content, perhaps to better align with your overall website design or to highlight specific elements of a particular post. This flexibility is crucial for creating a unique and engaging user experience, tailored to the specific needs of your blog or website.Hiding featured images on individual posts offers a powerful way to customize the display of content, allowing you to focus on different aspects of your articles, such as text or other media.
This customization is essential in WordPress, as a one-size-fits-all approach rarely satisfies the diverse needs of bloggers and website owners. There are numerous scenarios where this technique proves useful.
Common Scenarios for Hiding Featured Images
This technique allows for varied content layouts, making it especially useful when you need to focus on alternative visual elements or tailor the post design to better suit the content. For example, if a post is primarily focused on a gallery of images, a featured image might be redundant. Alternatively, a post might have a more text-heavy focus, where the visual emphasis on a featured image could detract from the overall reading experience.
This ability to adapt to different content types is a crucial element of WordPress customization.
Advantages and Disadvantages of Hiding Featured Images
| Advantages | Disadvantages |
|---|---|
| Improved visual hierarchy: By removing the featured image, you can create a cleaner, more focused layout that draws attention to the post’s content. | Loss of visual context: Removing the featured image can make it more difficult for users to quickly understand the post’s subject matter at a glance. This is especially true if the featured image is frequently used to give a visual preview of the post’s topic. |
| Enhanced design control: Hiding featured images provides more control over the overall design and visual presentation of individual posts, allowing for a more personalized user experience. | Potential for reduced engagement: While hiding images can enhance certain elements, it might reduce visual appeal and user engagement if the featured image was crucial in attracting attention to the post. |
| Customization for specific content types: The ability to hide featured images lets you tailor the presentation for posts with different content types, such as those heavily focused on text or galleries. | Less immediate visual cues: Users might not quickly grasp the post’s theme or subject matter if the featured image is absent. This is a trade-off that requires careful consideration when deciding to hide the featured image. |
| Greater flexibility in post layout: By removing the featured image, you can adjust the layout of individual posts to better fit your aesthetic preferences or the specific content of the post. | Potential loss of value: In some cases, the featured image plays a role in search engine optimization. Removing it could impact the visibility of the post in search results, although this impact varies. |
Methods for Hiding Featured Images

Hiding featured images on individual WordPress posts can be useful for various design purposes or when the image isn’t relevant to the content. Different approaches exist, each with its own advantages and disadvantages in terms of complexity and required technical skills. This section explores these methods, enabling you to choose the most suitable one for your specific needs.Understanding the nuances of each method allows you to tailor the approach to your website’s specific requirements, ensuring a seamless user experience.
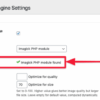
WordPress Plugins
WordPress plugins provide a user-friendly way to hide featured images. Many plugins offer extensive customization options beyond just image hiding, allowing for more comprehensive control over post presentation. Choosing a reliable and well-maintained plugin is crucial to avoid potential compatibility issues or security risks.
- Several popular plugins, like “Advanced Custom Fields,” “Image Optimization,” or dedicated image management plugins, often include options to disable featured images on a per-post basis. Detailed instructions for using such plugins usually come with comprehensive documentation, guiding users through steps like activating the plugin, accessing the post editor, and selecting the desired option to hide the image.
- Often, the plugin interface allows direct manipulation of featured images within the post editor. This is a straightforward approach that typically requires minimal technical knowledge. You simply find the relevant option within the plugin’s settings or the post editor itself.
Custom CSS Code
Custom CSS code offers a powerful, yet potentially more complex method for hiding featured images. This approach requires some understanding of CSS and WordPress theme structures.
- A simple CSS rule targeting the `.featured-image` or similar class used by your theme to display the featured image can hide it. This is a direct and effective approach.
- Targeting the `post-thumbnail` class within the specific post’s CSS will target that particular image. To avoid affecting other posts, this is a targeted solution.
- Inserting the CSS code directly into your theme’s stylesheet or using a child theme is recommended for maintaining compatibility. This approach allows easy maintenance and avoids overriding other essential styles.
Theme Customization Options
Many WordPress themes offer built-in options to hide featured images on a per-post basis. This approach is often the easiest method for users with limited technical skills.
- Theme customization options may present an interface for managing featured images within the post editing interface. Look for options related to displaying or hiding the featured image.
- These options often appear within the theme settings or a specific section within the post editor.
Comparison Table
| Method | Effectiveness | Complexity | Technical Skills |
|---|---|---|---|
| WordPress Plugins | High | Low | Basic |
| Custom CSS | High | Medium | Intermediate |
| Theme Customization | High (if available) | Low | Basic |
Understanding WordPress Theme Functionality
WordPress themes are the visual skins that dictate how your website looks and functions. They control everything from the layout of your posts to the way featured images are displayed. A core aspect of this control lies in the template files within the theme folder. These files act as instructions, telling WordPress how to assemble the different elements of a webpage.
Understanding these template files is crucial for customizing the display of featured images, including how and where they appear.Theme developers meticulously craft these template files, including those responsible for handling featured images. They often utilize WordPress’s built-in functions to incorporate featured images into the post display. This often includes specific functions and variables for retrieving, sizing, and presenting the featured image in the desired manner.
Theme developers typically use these functions and variables in a structured way that allows for customization and control over the final output.
Ever wanted to ditch those featured images on individual WordPress posts? It’s surprisingly easy to customize your site’s look, and understanding user preferences, like how they want to see their content, is key. For instance, a recent trend involves hiding featured images on individual posts, but incorporating user feedback, like in the importance of user feedback in web design , is crucial for creating a site that truly resonates with your audience.
Thankfully, there are several plugins and code snippets available to achieve this effect, making your website visually appealing and user-friendly.
Theme Template Files and Featured Images
WordPress themes use various template files to display content, including posts. The structure of these files is often consistent across themes, allowing for predictable manipulation. The specific file responsible for displaying individual posts usually contains instructions for integrating featured images. These files often include placeholders or variables that WordPress recognizes and fills with the relevant post information, including the featured image.
Default Featured Image Handling
Themes often include default settings for how featured images are displayed. These defaults may specify a fixed size, alignment (left, right, or center), and a specific location within the post layout. For example, a theme might use the `the_post_thumbnail()` function to display the featured image in a specific column next to the post content, or above the content in a larger size.
A theme might also choose to display no featured images at all. These default settings are important to consider as they provide a baseline for the appearance of featured images and can be modified for more complex display configurations.
Customization Affecting Featured Image Display
Theme customization, through plugins or manual code edits, can alter how featured images are displayed. Changes to the CSS or PHP code within the theme files can affect the size, position, and styling of the featured image. A custom CSS rule, for instance, could resize or reposition the image to fit the design aesthetic of the website. Similarly, altering the PHP code could change how the featured image is integrated into the post template, potentially changing its visibility entirely.
Typical Theme File Structure for Featured Images
| File Type | Description | Typical Function |
|---|---|---|
single.php |
Template file for displaying individual posts. | Often contains the code to include featured images within the post’s display. |
index.php |
Template file for displaying the home page or archive pages. | May display featured images in a list view or similar display for archives or homepage posts. |
functions.php |
Theme’s custom functions file. | May contain custom functions for handling featured images (e.g., image resizing, altering output). |
style.css |
Theme’s stylesheet. | Contains CSS rules that control the visual presentation of the featured image (size, alignment, etc.). |
Using Custom CSS for Image Hiding
Custom CSS provides a powerful and flexible way to control the visibility of featured images on individual WordPress posts. It allows for precise targeting, enabling you to hide images based on specific criteria, such as post type, content area, or even screen size. This method offers a degree of control that other approaches may lack.Using CSS selectors, you can isolate the featured image element within the post template and apply specific styling to it, including hiding it.
This targeted approach avoids impacting other parts of the website’s design and allows for more nuanced control over the presentation of your content. It’s an essential skill for any developer or designer who wants to customize WordPress layouts beyond the basic options.
Targeting the Featured Image Element
The featured image element often resides within a specific HTML structure. Identifying the correct CSS selector is crucial for precise targeting. This often involves navigating the post template’s HTML code to find the element containing the image. Tools like the browser’s developer tools are valuable for inspecting the HTML structure and identifying the relevant class names or IDs.
Once the selector is determined, you can effectively target the image.
Using CSS Selectors for Isolation
CSS selectors allow you to precisely target specific elements. For example, you could hide the featured image for all posts within a specific category. You can also use selectors to target posts based on their IDs or classes. This method enables targeted hiding, preventing unintended consequences on other elements or posts. For example, a class added to a post by a plugin could be used as a selector.
Using the Display Property
The `display` property in CSS controls the visibility of an element. Setting `display: none;` will effectively hide the featured image. This approach is simple, effective, and doesn’t impact the layout in a significant way, leaving the content area unhindered.
Examples of CSS Rules for Hiding Featured Images
Here are some examples of CSS rules for hiding featured images across various screen sizes:
- To hide the featured image for all posts, you would use a selector that targets the image element within the post template, such as
.featured-image img. - For hiding the featured image on specific posts, use a more specific selector. For example, if you have a class named
no-featured-imageon a particular post, you could use.no-featured-image .featured-image img. - To hide the featured image on mobile devices, you can use media queries. For example,
@media (max-width: 768px) .featured-image img display: none;will hide the image on screens smaller than 768 pixels wide.
CSS Selector Table
This table demonstrates various CSS selectors and their applications in hiding featured images:
| Selector | Description | Application |
|---|---|---|
.featured-image img |
Targets the image element within the class “featured-image”. | Hides the featured image across all posts. |
#post-123 .featured-image img |
Targets the image element within the class “featured-image” for post with ID 123. | Hides the featured image for a specific post. |
.category-photography .featured-image img |
Targets the image element within the class “featured-image” for posts in the “Photography” category. | Hides featured images for posts in a specific category. |
@media (max-width: 768px) .featured-image img display: none; |
Hides the featured image for screens with a maximum width of 768 pixels. | Hides featured images on smaller screens. |
Employing WordPress Plugins
WordPress plugins offer a convenient and often streamlined approach to hiding featured images on individual posts. They provide pre-built solutions, saving you the effort of manually crafting CSS or modifying theme files. This approach often results in a more user-friendly method for managing post visual elements.Many plugins offer more comprehensive control than just image hiding, potentially affecting other aspects of the post display.
Understanding the specific features and potential drawbacks of each plugin is essential for selecting the right tool for your needs.
Popular WordPress Plugins for Featured Image Hiding
Several popular plugins provide options for hiding or modifying featured images on a per-post basis. These plugins often offer more features beyond just hiding images, potentially offering custom display options or other visual customizations.
Advantages and Disadvantages of Using Plugins
Using plugins for hiding featured images presents both advantages and disadvantages. Plugins can simplify the process, often requiring minimal effort. However, plugins can add complexity to your website and introduce potential compatibility issues with other plugins or themes. Their functionality might not precisely match your specific requirements, potentially leading to limitations. Careful selection and understanding of plugin capabilities are crucial.
How to Install and Activate Plugins
Installing and activating plugins is a straightforward process within the WordPress dashboard. Locate the “Plugins” section in your WordPress admin panel. Search for the desired plugin using the search bar. Click “Install Now,” then “Activate.” Following the plugin’s specific instructions for configuration is important.
Configuration Options in Image Hiding Plugins
Configuration options within these plugins vary depending on the specific plugin. Some plugins might allow you to hide featured images for individual posts, while others might provide options for controlling the visibility of featured images across entire categories or post types. Comprehensive configuration often includes options for custom display and placement, enabling more nuanced control over the image display on your website.
Plugin Comparison Table
| Plugin Name | Key Features (Image Hiding) | Pros | Cons |
|---|---|---|---|
| Simple Image Control | Allows post-specific image visibility, supports variations | Easy to use, good for basic hiding needs. | Limited advanced customization options. |
| Advanced Image Management Pro | Provides extensive control over featured images, supports custom styles and layouts | Highly customizable, caters to diverse needs. | Steeper learning curve, potentially more complex setup. |
| Featured Image Toggle | Straightforward on/off switch for featured images. | Quick to implement for basic hiding. | Limited flexibility in post-specific customization. |
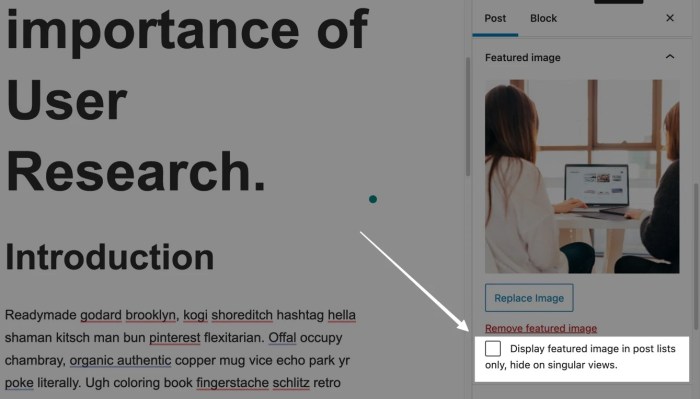
Post-Specific Image Hiding Techniques
Sometimes, you might want to hide the featured image on a specific post without impacting other posts. This is useful for various scenarios, such as showcasing different content formats or adjusting visual presentation for specific articles. WordPress offers several methods to achieve this granular control.Customizing the display of featured images on a per-post basis involves modifying the post’s metadata or using custom functions to control image visibility.
Conditional statements allow you to apply specific rules based on the post’s ID or other criteria, ensuring the featured image is hidden only where necessary without affecting other posts.
Methods for Post-Specific Image Hiding
To hide the featured image on a per-post basis, you can leverage various methods. These approaches offer varying degrees of complexity and control.
- Using WordPress Custom Fields:
- Modifying Post Metadata:
- Custom Functions and Conditional Statements:
A straightforward approach is to add a custom field to the post. This field can store a boolean value (true/false) indicating whether the featured image should be displayed. A custom function can then check this value and conditionally display the image. For instance, you could create a custom field called “hide_featured_image” and set its value to “true” for the posts where you want to hide the image.
While less flexible than custom fields, modifying post metadata provides a simple way to control the visibility of featured images on a per-post basis. You could add a metadata value that directly tells WordPress to hide the image. This is a more direct approach, but it might not be as easily maintained as custom fields for more complex situations.
Ever wanted to ditch those featured images on individual WordPress posts? It’s surprisingly easy to do! Sometimes, though, you might need to block certain advertising channels, like on TikTok. Fortunately, you can find helpful resources on how to block TikTok ads using exclusion lists, like those available on tiktok ads exclusion lists. Once you’ve managed those ad preferences, you can get back to tweaking your WordPress post display, and hiding those featured images with ease.
For more complex scenarios or when needing to apply specific logic, custom functions provide the most control. These functions can check the post ID or other criteria to determine whether the featured image should be displayed. Conditional statements within the functions allow for precise control, ensuring that the image is hidden only for targeted posts. A function might check if a post belongs to a specific category or if a custom field is set to a particular value, and then display or hide the featured image accordingly.
A critical aspect of using custom functions is avoiding impacting other parts of the theme, and to ensure that the function is appropriately hooked into the theme’s display process.
Example of a Custom Function
“`phpfunction hide_featured_image_by_post_id($post_id) // Check if the post ID matches a specific post. if ($post_id === 123) // Replace 123 with the actual post ID. return false; // Hide the image. return true; // Show the image.add_filter(‘post_thumbnail_html’, ‘filter_featured_image_by_post_id’, 10, 2);function filter_featured_image_by_post_id($html, $post_id) if (!hide_featured_image_by_post_id($post_id)) return ”; // Return empty string to hide the image.

return $html;“`This example demonstrates a function that hides the featured image only for post ID 123. It filters the HTML output of the post thumbnail, returning an empty string if the image should be hidden. This method is very versatile and can be adapted to various criteria.
Comparison Table
| Method | Advantages | Limitations |
|---|---|---|
| Custom Fields | Flexible, allows for various criteria, easy to manage for a specific task. | Requires adding custom fields, might not be suitable for very large-scale modifications. |
| Modifying Post Metadata | Simple, direct approach. | Limited flexibility compared to custom fields, less adaptable to complex criteria. |
| Custom Functions | Highly flexible, allows for complex logic based on various criteria (e.g., categories, tags, custom fields). | Requires coding knowledge, more complex to implement, potential for conflicts with theme functions. |
Responsive Image Display Considerations: How To Hide Featured Images On Individual Posts In WordPress
Ensuring your featured image hiding mechanism works seamlessly across different devices and screen sizes is crucial for a positive user experience. A website that looks great on a desktop might not function optimally on a smartphone or tablet. Responsive design principles are vital for maintaining usability and aesthetics across various platforms.Responsive design, in this context, means tailoring the display of the featured image based on the user’s device and screen size.
This adaptability prevents the image from overwhelming smaller screens or disrupting the layout, thus improving user engagement.
Responsive Image Hiding with Media Queries
Media queries are a powerful CSS feature that allows you to apply different styles based on the characteristics of the user’s device. This is essential for adjusting the visibility of featured images for various screen sizes. By employing media queries, you can effectively hide the featured image on mobile or tablet devices without impacting the desktop experience.
This approach provides a more fluid and intuitive user experience. It’s crucial to ensure that the featured image’s absence on smaller screens does not compromise the overall design and layout of the post.
Media Query Examples
The following CSS examples demonstrate how to use media queries to hide the featured image on different screen sizes. These examples are written in a way that allows for easy integration into your existing WordPress theme’s CSS.
/* Hide featured image on screens smaller than 768px (tablets and phones)
-/
@media (max-width: 768px)
  .featured-image
    display: none;


/* Example for different breakpoint, showing how to adjust to different device types
-/
@media (max-width: 480px)
  .post-content
    padding: 15px; /* Adjust padding for better content readability
-/
Media Query Rules and Screen Sizes
The following table Artikels common media query rules and their corresponding screen sizes, offering guidance for crafting responsive designs.
Ever wanted to ditch those featured images on individual WordPress posts? It’s surprisingly easy to do! There are several plugins and custom code solutions out there to achieve this. Understanding how Google AI overviews clicks traffic impact, however, might reveal that strategically using featured images could still be important. google ai overviews clicks traffic impact might help you decide if it’s worth the effort, especially if you want to maintain optimal SEO.
Regardless, the WordPress options for hiding them are straightforward, so you can tweak your site’s look and feel easily.
These breakpoints are general guidelines and can be adjusted based on your specific theme and target audience.
| Media Query | Screen Size Description |
|---|---|
| @media (max-width: 768px) | Tablets and smaller screens |
| @media (max-width: 480px) | Smaller mobile phones |
| @media (min-width: 992px) | Larger screens, potentially desktop or laptop |
Avoiding Common Errors and Troubleshooting
Hidden featured images can sometimes lead to unexpected results. Understanding potential pitfalls and troubleshooting strategies is crucial for successful implementation. This section will cover common problems encountered when hiding featured images and provide practical solutions.
Careful attention to detail and a systematic approach to troubleshooting are essential to resolving issues that may arise. Whether using custom CSS or plugins, understanding the underlying cause of a problem is key to finding a lasting solution.
Potential Issues with CSS-Based Hiding
Incorrectly written CSS rules can lead to unintended consequences. Incorrect selectors, conflicting styles, or issues with cascading stylesheets can all hinder the hiding process. Carefully checking the syntax and ensuring proper specificity are vital steps to prevent unexpected behaviors.
Potential Issues with Plugin-Based Hiding
Plugins, while often user-friendly, can sometimes introduce compatibility problems. Conflicting plugins, outdated versions, or problems with plugin interactions can all cause the hiding process to fail. Thorough plugin management and ensuring compatibility with other active plugins is essential.
Diagnosing and Resolving Conflicts
Using browser developer tools is a critical troubleshooting step. Inspecting the website’s source code can pinpoint conflicting styles or missing elements. Examining the rendered HTML and the applied CSS allows for accurate identification of issues and their resolution.
Inspecting Website Source Code
Using browser developer tools (like those in Chrome, Firefox, or Safari) to inspect the website’s source code is an essential part of troubleshooting. Look for discrepancies between the intended CSS rules and the actual styles applied to the elements. This method allows you to visually confirm if the CSS selectors are targeting the correct elements and if the styles are correctly applied.
Troubleshooting Table, How to hide featured images on individual posts in wordpress
| Error | Description | Troubleshooting Steps |
|---|---|---|
| Featured image not hidden | The featured image is still visible, despite the applied CSS or plugin settings. | Verify CSS selectors are correct and target the correct elements. Check for conflicting styles in other CSS files. Ensure the plugin is activated and properly configured. Examine the website’s source code to see if the styles are actually being applied. |
| Unexpected visual issues (e.g., layout shifts) | Hiding the featured image causes unintended layout changes. | Review the CSS rules for potential margin or padding issues that affect adjacent content. Check for conflicting styles from other plugins or themes. Carefully inspect the website’s source code to identify the elements that are causing the layout shifts. |
| Plugin conflicts | The plugin used to hide the image conflicts with another plugin. | Disable other plugins temporarily to isolate the conflict. Update plugins to the latest versions, ensuring compatibility. Check plugin documentation for potential conflicts. |
| Incorrect CSS selectors | The CSS selectors used to hide the image are incorrect, failing to target the intended elements. | Double-check the CSS selectors to ensure they accurately target the featured image container. Consider using more specific selectors if necessary (e.g., adding class names). Inspect the website’s source code to visually confirm the target elements. |
Alternative Solutions and Considerations
Sometimes, hiding a featured image isn’t the only solution. There are alternative ways to manage and replace featured images, potentially offering a better user experience and more control over the visual presentation of your WordPress posts. This section explores these options, from using alternative image placements to displaying placeholder images.
Consideration of user experience is crucial when modifying visual elements. A thoughtfully designed presentation enhances engagement and comprehension. By providing alternative methods for handling featured images, we ensure a seamless and user-friendly experience across different devices and screen sizes.
Alternative Image Placements
Using featured images as the primary visual element on a post is common, but they are not the only option. The post content itself could potentially contain images within the body, enhancing visual appeal and providing context. These images can be incorporated naturally within the flow of the content, improving the user’s overall experience by reducing distractions and increasing engagement.
Strategically placing images in the body of the post can lead to a more engaging reading experience.
Displaying Placeholder Images
A placeholder image acts as a temporary visual element until the actual featured image is loaded. This approach is particularly useful when the featured image is not yet available or is not optimized for display. Using a generic placeholder image avoids a blank space and provides a visually appealing, anticipatory element. Placeholder images can also assist in the visual organization and consistency of your website’s design.
Using No Image
In some instances, a post may not require a featured image at all. Removing the featured image entirely can result in a cleaner and more focused presentation, particularly when the post content itself is the primary source of information. This approach is appropriate when the focus is entirely on text content or when the visual aspect of the post is less critical.
Consideration of post type and content theme will help determine if a featured image is necessary.
Comparative Analysis of Featured Image Management Methods
| Method | Description | Pros | Cons |
|---|---|---|---|
| Using Alternative Image Placements | Images integrated within the post content | Improved user experience, enhanced visual appeal | May require more careful design, might not suit all post types |
| Using Placeholder Images | Temporary image to indicate featured image | Prevents blank spaces, provides a visual cue | May not be ideal for high-quality content |
| Using No Image | Omitting featured image altogether | Focuses on text content, cleaner design | Might not be suitable for posts that heavily rely on visuals |
Ending Remarks
In conclusion, hiding featured images on individual WordPress posts is achievable through several methods. Understanding theme functionality, mastering CSS, or utilizing plugins allows for a customized experience. This guide has provided detailed steps, ensuring you can effectively hide featured images for specific posts without impacting other content.