
How to enable imagick on your wordpress site – How to enable ImageMagick on your WordPress site is crucial for optimizing images and enhancing site performance. This guide dives deep into the process, from understanding ImageMagick’s role to troubleshooting potential issues and securing your setup.
ImageMagick is a powerful tool for image manipulation. It can significantly improve your WordPress site’s performance by optimizing images for faster loading times. This comprehensive guide will walk you through every step, ensuring a smooth and successful integration.
Introduction to ImageMagick on WordPress
ImageMagick is a powerful, open-source software suite for manipulating images. It’s a versatile tool that can significantly enhance your WordPress site by providing a range of image processing capabilities. From resizing and optimizing images to applying various filters and effects, ImageMagick offers a robust solution for handling images within a WordPress environment. Its extensive features make it a valuable asset for improving site performance and visual appeal.Using ImageMagick in WordPress allows for greater control over image dimensions, quality, and format.
This precise control translates to improved website speed, as optimized images consume less bandwidth and load faster. The ability to perform batch processing further streamlines workflow and reduces manual effort, making it ideal for managing a large number of images on a WordPress site.
Benefits of Using ImageMagick in WordPress
ImageMagick provides a plethora of advantages for WordPress sites. It allows for efficient image resizing, reducing file sizes without compromising quality. This directly contributes to faster page load times, a critical factor for search engine rankings and user experience. Furthermore, ImageMagick enables sophisticated image manipulation, such as applying filters, creating watermarks, and converting between various image formats.
Figuring out how to enable Imagick on your WordPress site can be tricky, but it’s totally doable! Understanding earned media strategies, like those discussed in earned media in professional services 3 strategies for success , can actually help you boost your website’s performance. Ultimately, a well-optimized WordPress site with enabled Imagick is key for delivering a great user experience, and it all starts with the right configuration.
Common Use Cases for ImageMagick on a WordPress Site
ImageMagick excels in numerous applications on a WordPress site. A common use case is optimizing images for different display sizes, ensuring images render correctly across various devices and screen resolutions. Another use case is automating image resizing and cropping tasks for different content types, streamlining workflow and reducing manual labor. ImageMagick is also useful for creating thumbnails and previews for posts and products.
Comparison of ImageMagick with Alternative Image Optimization Methods
| Feature | ImageMagick | Plugins (e.g., ShortPixel, Smush) | CDN (e.g., Cloudflare) |
|---|---|---|---|
| Image Manipulation | Extensive, allows complex transformations (filters, effects, conversions) | Limited, primarily focuses on compression | No direct image manipulation; focuses on delivery |
| File Size Reduction | Highly effective, often achieving significant reductions | Effective, but results can vary based on image type and plugin settings | No direct file size reduction; focuses on delivery speed |
| Speed Improvement | Directly improves page load speed by optimizing images | Improves speed through optimization | Improves speed by caching and delivering images closer to users |
| Customization | High degree of customization through command-line interface (CLI) | Limited customization; primarily based on plugin settings | High level of customization through CDN settings |
| Cost | Free and open-source | Often paid, but free plugins are available | Can vary based on plan |
The table above illustrates a comparison of ImageMagick with alternative image optimization methods. Note that each approach has its own strengths and weaknesses, and the best solution depends on the specific needs and resources of the WordPress site.
Prerequisites for Enabling ImageMagick

ImageMagick is a powerful tool for image manipulation, but its use on a WordPress site hinges on fulfilling certain server-side requirements. Proper installation and configuration are crucial for smooth operation and avoid unexpected errors. These prerequisites ensure ImageMagick interacts seamlessly with your WordPress environment.Successfully enabling ImageMagick on your WordPress site necessitates a robust foundation on your server. This involves verifying the presence of essential components and confirming their proper functionality.
Server-Side Requirements
ImageMagick itself needs to be installed on your web server. This installation typically involves downloading the package, unpacking it, and configuring it according to the specific instructions for your operating system. Consult the ImageMagick documentation for detailed installation procedures specific to your server environment (e.g., Linux, macOS, Windows).
PHP Extensions
ImageMagick’s functionalities are accessed through PHP extensions. The crucial extension is the `ImageMagick` extension. This extension allows PHP scripts to interact with the ImageMagick library.
Verifying PHP Extensions
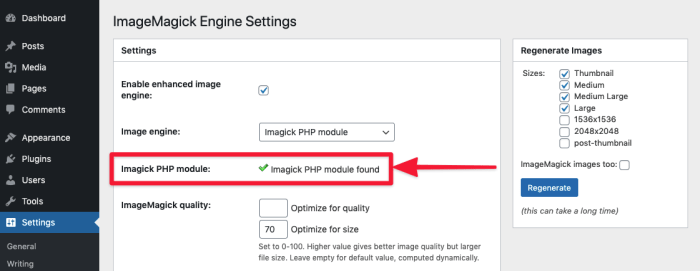
Confirming the presence and activation of the `ImageMagick` PHP extension is essential. You can achieve this using PHP’s `phpinfo()` function. Access the `phpinfo()` page in your WordPress admin area, or by visiting a specific URL on your server, usually `yourwebsite.com/info.php` or a similar file. Look for the `ImageMagick` entry. If it’s present and says “enabled”, then the extension is loaded correctly.
If not, you need to install and enable the extension on your server.
Potential Conflicts
Compatibility is key. Ensure that any existing WordPress plugins or themes do not interfere with the ImageMagick installation or the PHP extension. Thorough testing is advised to identify and resolve any conflicts that might arise. Consider updating plugins or themes if possible to ensure compatibility. Check the plugin and theme documentation for potential conflicts with ImageMagick.
Server Permissions
ImageMagick processes need appropriate permissions to access files and directories. Verify that the user running your web server (often `www-data` or similar) has read and write access to the directories where ImageMagick needs to operate. Ensure ImageMagick has the necessary permissions to access the directories and files it needs for its operations. Using the `ls -l` command or similar file permissions checking commands in your server terminal will help identify if permissions are adequate.
For instance, a typical command would be `sudo ls -l /path/to/image/directory`. If permission issues exist, consult your hosting provider for assistance in adjusting user permissions.
Installing ImageMagick on Your Server: How To Enable Imagick On Your WordPress Site
ImageMagick is a powerful tool for manipulating images, and enabling it on your WordPress site often requires installing it on your server. This process varies depending on your server’s operating system, but the core principles remain the same. Understanding these steps is crucial for seamless image handling within your WordPress site.
Installation on Linux Servers
The installation process on Linux servers, using distributions like Ubuntu or CentOS, often involves using package managers. This method ensures the necessary dependencies are also installed, preventing potential conflicts.
- Update the package list: This ensures you have the latest information about available packages. A command like `sudo apt update` (for Ubuntu) or `sudo yum update` (for CentOS) will achieve this.
- Install ImageMagick: Use the appropriate command for your distribution. For Ubuntu, `sudo apt install imagemagick` will install the package. For CentOS, `sudo yum install ImageMagick` will accomplish the same.
- Verify Installation: After installation, verify ImageMagick’s presence and functionality using `convert -version`. This command displays the version and other details.
Installation on Windows Servers
Windows servers often use different methods for installing ImageMagick. Downloadable packages are frequently the preferred approach.
- Download the Installer: Download the appropriate ImageMagick installer from the official ImageMagick website. Ensure the version is compatible with your server’s architecture.
- Run the Installer: Execute the downloaded installer. Follow the on-screen instructions, selecting the desired components for installation.
- Verification: After installation, locate the ImageMagick binaries in the specified directory. Use a command-line tool to verify the installation.
Configuring ImageMagick for Your Web Server, How to enable imagick on your wordpress site
Correct configuration is essential for ImageMagick to work seamlessly with your web server. This involves specifying the location of the ImageMagick binaries to your web server.
- Identify the Path: Determine the directory where ImageMagick binaries are located on your server.
- Update Server Configuration: Edit the configuration file for your web server (e.g., Apache or Nginx). Add the necessary directives to point to the ImageMagick binaries. This configuration ensures the web server can find and use the ImageMagick tools.
- Testing: After updating the configuration, test the ImageMagick installation by using a simple PHP script to perform an image manipulation task. Verify that the script executes correctly.
Verification and Testing
Thorough verification is essential to ensure ImageMagick is functioning correctly. Simple tests can confirm the installation and its usability.
- PHP Script Test: Create a simple PHP script that utilizes ImageMagick functions. Execute this script to verify that the ImageMagick library is accessible to your PHP scripts. A simple script that performs a basic image manipulation will suffice.
- Command-Line Verification: Execute ImageMagick commands from the command line to confirm its functionality. Attempting basic conversions or manipulations using command-line tools will provide confirmation.
Summary Table
| Operating System | Installation Steps |
|---|---|
| Linux (e.g., Ubuntu) | Update package list, install ImageMagick using package manager, verify installation |
| Windows | Download installer, run installer, verify installation, configure web server |
Configuring ImageMagick in WordPress
ImageMagick, a powerful image manipulation library, enhances WordPress by enabling complex image processing. Proper configuration ensures seamless integration, optimizing performance and functionality. This section details various methods for configuring ImageMagick within your WordPress environment, from using configuration files to integrating with specific plugins.Configuring ImageMagick for WordPress involves several steps, including ensuring the ImageMagick library is correctly installed and accessible to your WordPress application.
Figuring out how to enable Imagick on your WordPress site can sometimes be tricky, but it’s a crucial step for smooth image handling. Once you’ve got that sorted, you’ll likely want to consider Google’s advice on fixing unwanted indexed URLs, googles advice on fixing unwanted indexed urls , as these can impact your SEO. Ultimately, a well-configured Imagick setup and a clean URL structure are key for a robust WordPress experience.
This process can differ depending on your hosting environment, and the methods detailed here will help you achieve successful integration.
Methods for Configuring ImageMagick
Different methods cater to various hosting environments and WordPress setups. Understanding these approaches allows you to tailor the configuration to your specific needs.
- Using .htaccess: The .htaccess file, a configuration file for Apache web servers, can be used to control how ImageMagick is accessed. It allows for fine-grained control over which files ImageMagick can process. This method is often preferred for its flexibility and ease of modification.
- Server-level Configuration: Some hosting providers offer pre-configured ImageMagick installations. In these cases, your configuration might involve setting environment variables or adjusting server-side directives. This approach streamlines the setup but relies on your hosting provider’s setup.
- WordPress Plugins: Several plugins automate the ImageMagick configuration process within WordPress. They often handle the necessary interactions with the server, making configuration simpler for users without server-side access.
Adding ImageMagick Support to Your WordPress Environment
This process requires a combination of server-side and potentially WordPress-specific adjustments. The steps below Artikel a general procedure.
- Verify ImageMagick Installation: Ensure the ImageMagick library is correctly installed on your server. This is crucial for successful configuration. Check the ImageMagick installation directory and related files to confirm proper installation.
- Configure Server Settings (if needed): Some hosting providers might require adjustments to server-level configurations. These settings might include environment variables or directives in the server configuration file.
- Modify .htaccess (if applicable): In the .htaccess file, add directives to enable ImageMagick for specific WordPress files or directories. This step ensures ImageMagick can handle image processing requests.
- Test ImageMagick Integration: Verify that ImageMagick functions correctly by running tests within your WordPress environment. This step helps identify any configuration errors early on.
Using .htaccess or Other Configuration Files for ImageMagick
Using configuration files like .htaccess provides a centralized method for controlling access to ImageMagick. This approach ensures ImageMagick is only used for specific WordPress functions, improving security and efficiency. A well-configured .htaccess file can restrict access to image processing functions to authorized directories or files, preventing unauthorized access to image manipulation.
Figuring out how to enable Imagick on your WordPress site can sometimes feel like navigating a maze. But fear not, there’s a light at the end of the tunnel! Recent updates to Google Business Profiles, with their new “What’s Happening” feature, google business profiles launches whats happening , are making it easier than ever to keep your online presence fresh.
Thankfully, the steps to enable Imagick are pretty straightforward once you’ve got the hang of it, so get ready to level up your WordPress site!
Comparison of WordPress Plugins Offering ImageMagick Integration
Several plugins offer ImageMagick integration. A comparison can help you choose the most suitable option for your needs.
| Plugin Name | Key Features | Pros | Cons |
|---|---|---|---|
| Plugin A | Handles basic image resizing and manipulation. | Easy to install and use. | Limited advanced features. |
| Plugin B | Supports more complex image transformations and advanced options. | Greater flexibility and control. | Steeper learning curve. |
Integrating ImageMagick with a Specific WordPress Plugin or Theme
The process for integrating ImageMagick with a specific plugin or theme often involves modifying the plugin’s or theme’s code to use ImageMagick functions. Ensure the plugin or theme is compatible with ImageMagick and is configured correctly. Detailed instructions should be available in the plugin or theme documentation. For example, a theme might use ImageMagick to resize images automatically when they are uploaded, improving website performance and user experience.
Troubleshooting Common Issues
Successfully installing and configuring ImageMagick on your WordPress server is crucial for various image manipulation tasks. However, unexpected errors can arise during this process. This section details potential problems and provides practical solutions to common issues, ensuring a smooth and error-free ImageMagick setup.Troubleshooting ImageMagick involves systematically identifying the source of the problem and implementing appropriate fixes. Understanding the nature of errors and their potential causes is key to efficiently resolving them.
ImageMagick Installation Errors
ImageMagick installation can sometimes encounter issues related to dependencies or server permissions. Careful attention to these details is critical for a seamless installation. Problems can stem from missing prerequisites or insufficient permissions for the installation process. Reviewing the installation log files for specific error messages is a vital step.
- Missing Dependencies: Ensure all required packages, such as development headers and libraries, are present and correctly installed on your server. Consult your server’s documentation for the precise steps required for your operating system and distribution.
- Permission Issues: Verify that the server user account has the necessary permissions to create directories and write files during the ImageMagick installation process. Insufficient permissions can lead to installation failures.
- Incorrect Configuration: Double-check that the installation process follows the correct steps for your specific server environment. Misconfigurations in the installation script or command can result in errors.
WordPress Configuration Errors
Enabling ImageMagick within WordPress often involves configuring PHP extensions. Incorrect configurations can lead to problems in accessing ImageMagick functionalities.
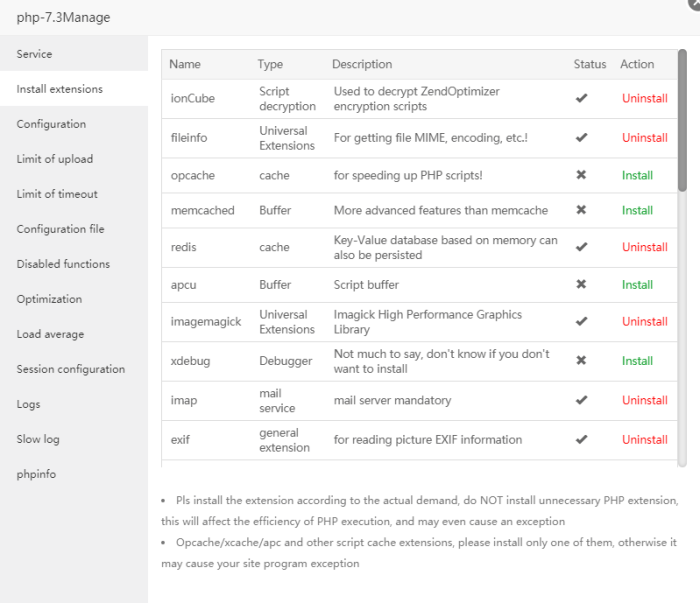
- PHP Extension Issues: Verify that the ImageMagick PHP extension is correctly enabled in your PHP configuration file (usually php.ini). Ensure the extension is loaded and functioning correctly. If it’s not enabled, you’ll need to enable it in your server’s PHP settings.
- Incorrect File Paths: Verify that the paths to ImageMagick libraries and executables are correctly configured in your PHP settings and WordPress environment. Inaccurate paths can hinder ImageMagick’s functionality.
- Compatibility Problems: Check the compatibility between your WordPress version, PHP version, and ImageMagick version. Incompatible versions can result in unexpected errors.
Permission Issues
Permissions related to ImageMagick files and directories are crucial for successful operation. Incorrect permissions can hinder access to ImageMagick functionalities.
- Insufficient Permissions: Verify that the web server user account has read and write permissions for ImageMagick installation directories. Insufficient permissions can prevent ImageMagick from functioning correctly. Use commands like `ls -l` and `chmod` to inspect and adjust permissions.
- Incorrect Ownership: Ensure that the ownership of ImageMagick directories and files is correctly assigned to the web server user account. Incorrect ownership can lead to permission issues.
Diagnosing PHP Extension Problems
Troubleshooting PHP extension problems often requires careful examination of error logs and server configurations.
- Checking Error Logs: Examine server error logs for specific error messages related to the ImageMagick PHP extension. These logs can provide valuable insights into the nature of the problem.
- PHP Configuration Review: Review your PHP configuration file (php.ini) to ensure that the ImageMagick extension is correctly enabled and that the appropriate paths are set.
- Extension Loading Verification: Use tools to verify that the ImageMagick PHP extension is loaded and functioning correctly. Review the PHP extension list to confirm the extension is present.
Error Code Troubleshooting Table
| Error Code | Description | Solution |
|---|---|---|
| `Error loading module` | The ImageMagick PHP extension failed to load. | Ensure the extension is enabled in php.ini and the ImageMagick installation is correct. |
| `Could not find ImageMagick` | The PHP script cannot locate the ImageMagick libraries. | Verify the installation path of ImageMagick and adjust the PHP configuration accordingly. |
| `Permission denied` | The server lacks permission to access ImageMagick files. | Adjust file permissions using commands like `chmod`. |
Optimizing ImageMagick Performance
ImageMagick, while powerful, can sometimes struggle with large image processing tasks on less robust servers. Optimizing its performance is crucial for a smooth WordPress experience, especially when handling high traffic or complex image manipulations. Efficient ImageMagick usage translates to faster website loading times, reduced server strain, and a more responsive user experience.ImageMagick’s performance hinges on several factors, including server resources, configuration settings, and the specific image processing tasks being performed.
Understanding these factors allows for targeted optimization strategies.

Server Resource Allocation
Adequate server resources are fundamental for ImageMagick’s smooth operation. Insufficient memory, CPU power, or disk I/O can lead to bottlenecks and slowdowns. Ensuring your server has sufficient RAM and CPU cores dedicated to handling ImageMagick tasks is vital. Overloading the server with other processes will negatively impact ImageMagick’s performance.
ImageMagick Configuration
ImageMagick’s performance can be fine-tuned through configuration settings. Adjusting the maximum memory allocated to ImageMagick processes can prevent crashes due to memory exhaustion. Limiting the number of threads ImageMagick can utilize can also improve performance, especially on systems with limited CPU cores. Experimentation with these settings is often necessary to identify the optimal configuration for your specific server environment.
Image Optimization Techniques
Optimizing images before processing can significantly reduce the workload on ImageMagick. Compressing images using tools like TinyPNG or ImageOptim can drastically reduce file sizes, making processing faster. Using appropriate image formats (e.g., WebP for modern browsers) can also improve efficiency.
Measuring ImageMagick Performance
Monitoring ImageMagick’s performance is crucial for identifying bottlenecks and optimizing processes. Tools like system monitoring utilities (e.g., top, htop on Linux) can provide insights into CPU and memory usage during image processing tasks. By analyzing the resource consumption patterns, you can pinpoint areas needing improvement. Benchmarking image processing tasks before and after implementing optimization strategies helps quantify the impact of changes.
A simple script using the `time` command can accurately track processing durations.
Monitoring ImageMagick Processes
Monitoring ImageMagick processes provides crucial data on resource consumption. Utilize server-side monitoring tools to track CPU, memory, and disk I/O usage during image processing. Identify any processes that are consuming excessive resources and address the underlying causes. Regular monitoring enables proactive identification of potential performance issues. Logging ImageMagick errors and warnings provides valuable information for debugging and troubleshooting.
Security Considerations
Enabling ImageMagick on your WordPress site opens doors to potential security vulnerabilities if not handled carefully. Proper configuration and security best practices are paramount to safeguarding your website and user data. This section Artikels critical security measures to implement when integrating ImageMagick into your WordPress environment.Careful consideration of security is essential when using ImageMagick. A compromised ImageMagick installation can lead to serious security breaches, including remote code execution (RCE) attacks, file inclusion vulnerabilities, and data breaches.
Implementing robust security measures mitigates these risks and protects your website and users.
Security Best Practices
Implementing strong security practices when using ImageMagick on your WordPress site is crucial for preventing attacks. These practices include restricting access to the ImageMagick installation directory, using a secure and up-to-date version of ImageMagick, and properly configuring the application’s permissions.
- Restrict Access: Limit access to the ImageMagick installation directory to only authorized users and processes. Employing strong file permissions and access controls is vital for preventing unauthorized access to ImageMagick files and configuration settings. This includes limiting which parts of your website have access to execute ImageMagick commands.
- Keep Updated: Regularly update ImageMagick to patch security vulnerabilities. Outdated versions are more susceptible to known exploits, so maintaining current versions is a crucial preventative measure. Checking for updates and installing them promptly is a cornerstone of maintaining a secure system.
- Validate Input: Thoroughly validate all user-submitted data before passing it to ImageMagick. Input validation prevents malicious code from being executed by ImageMagick, thus preventing exploits like command injection. This includes checking for unexpected characters or patterns in image data, file names, or any other input.
Potential Vulnerabilities
Several vulnerabilities can arise from using ImageMagick, impacting your WordPress site’s security. These vulnerabilities often stem from improper handling of user input or outdated software versions. Understanding these potential issues is critical to developing effective mitigation strategies.
- Command Injection: Malicious users can potentially inject commands into user-provided data or file names, tricking ImageMagick into executing unintended commands. This could grant attackers access to sensitive system files or even execute arbitrary code on the server.
- File Inclusion Vulnerabilities: Improper validation of user-provided input can lead to attackers including files they control into ImageMagick’s processing pipeline. This could result in malicious code being executed or sensitive data being exposed.
- Buffer Overflow Attacks: If ImageMagick doesn’t handle large or malformed input data correctly, it can lead to buffer overflows. These overflows can cause the application to crash or even allow attackers to inject code.
Mitigation Strategies
Mitigating ImageMagick security risks involves implementing multiple layers of defense. This includes using secure coding practices, limiting access to critical resources, and adopting proactive security measures.
- Input Sanitization: Sanitize user-supplied data to prevent malicious input from reaching ImageMagick. This involves filtering out potentially harmful characters or code, preventing vulnerabilities like command injection and file inclusion.
- Least Privilege Principle: Grant ImageMagick only the necessary permissions to function. Restricting access to the ImageMagick installation directory and its files prevents malicious code from executing arbitrary commands or accessing sensitive data.
- Regular Security Audits: Regularly audit your ImageMagick configuration and usage to identify potential security gaps. Regular reviews are essential to detect and address any vulnerabilities that might have been introduced over time.
Security Precautions
Implementing these precautions ensures a more secure ImageMagick installation. It involves a multi-faceted approach focusing on restricting access, validating input, and keeping software up-to-date.
- Secure Configuration: Configure ImageMagick with restrictive permissions to limit its access to sensitive system files and resources.
- Input Validation: Validate all user inputs before passing them to ImageMagick to prevent malicious code injection.
- Software Updates: Regularly update ImageMagick to address security vulnerabilities.
- Firewall Configuration: Implement a firewall to block unauthorized access to the ImageMagick installation directory.
Common Security Threats & Prevention
Understanding common security threats and their prevention methods is essential for securing your WordPress site.
| Security Threat | Prevention Method |
|---|---|
| Command Injection | Input validation, using prepared statements, and avoiding direct user input in command strings. |
| File Inclusion | Input validation, whitelisting allowed file types, and restricting file access. |
| Buffer Overflow | Input validation, limiting input size, and using secure coding practices. |
| Privilege Escalation | Least privilege principle, limiting permissions, and using strong passwords. |
Advanced Techniques
ImageMagick, with its powerful suite of image manipulation tools, offers a wealth of advanced techniques beyond basic resizing and cropping. These techniques allow for significant customization and complex image processing within WordPress, opening up opportunities for unique visual experiences and enhanced user engagement. Mastering these methods can elevate your WordPress site’s design and functionality.Employing advanced techniques in ImageMagick within WordPress allows for the creation of custom image effects, tailored image manipulations, and the integration of complex processing steps directly into your site’s workflows.
This enhances visual appeal, user experience, and the overall sophistication of your website.
Customizing ImageMagick’s Image Manipulation Options
ImageMagick’s flexibility extends beyond pre-defined operations. Users can tailor image manipulation parameters to achieve precise results. This involves modifying settings like sharpness, color balance, and noise reduction levels. By manipulating these parameters, you can achieve specific visual outcomes that might not be possible with standard image editing tools.
Using ImageMagick for Complex Image Processing Tasks
ImageMagick is not limited to simple transformations. It can handle intricate tasks, such as creating layered images with transparent elements, or combining images from different sources. This allows for complex image compositions that would be difficult or time-consuming to create using other methods. For example, a website showcasing a collection of photographs might use ImageMagick to seamlessly blend different images into a single, dynamic display.
Leveraging ImageMagick for Creating Custom Image Effects
Creating custom image effects involves combining multiple ImageMagick operations. For instance, you could create a “vintage” effect by applying a sepia tone, desaturating colors, and adding a vignette. This requires a methodical approach to sequencing operations, allowing for more creative control over the final image. The ability to apply multiple effects sequentially gives you fine-grained control over the output image.
Creating a Custom ImageMagick Filter for WordPress
Developing a custom ImageMagick filter involves writing a script or command sequence that ImageMagick can execute. This allows for complex manipulations that are not directly available in standard ImageMagick functions. Such filters can be integrated into WordPress using plugins or custom functions. For example, a filter could be created to apply a specific artistic effect to images before they are displayed on the website, such as an oil painting filter or a specific artistic style.
A significant advantage is that the filter can be tailored to the specific needs of the site. This is done by precisely controlling the transformation steps. A user can create a unique and customized experience.
Closure
In conclusion, enabling ImageMagick on your WordPress site unlocks a world of image optimization possibilities. By following this detailed guide, you’ll not only enhance your site’s speed and performance but also gain control over image manipulation. Remember to prioritize security throughout the process, and don’t hesitate to explore the advanced techniques for further customization.