How to easily add CSS animations in WordPress is a guide to bringing your website to life with smooth transitions and engaging visual effects. Learn how to seamlessly integrate animations into your WordPress site, from simple button hovers to dynamic page transitions. We’ll cover everything from straightforward implementation with CSS directly to utilizing powerful plugins and exploring responsive design principles to ensure your animations look great on any device.
This guide will walk you through the process, offering clear explanations and practical examples. We’ll delve into different animation techniques, including keyframes and transitions, and show you how to integrate them into your WordPress theme’s CSS, widgets, and even plugins. Whether you’re a seasoned developer or just starting out, this comprehensive approach will empower you to enhance your WordPress site’s user experience with captivating animations.
Introduction to CSS Animations in WordPress
Adding CSS animations to your WordPress website breathes life into static pages. These animations enhance user engagement, create a more visually appealing experience, and subtly guide users through your site. They can transform simple interactions into dynamic experiences, significantly boosting the overall aesthetic and user-friendliness of your WordPress site.CSS animations are essentially snippets of code that dictate how elements on your website change over time.
They’re a powerful tool for achieving smooth transitions, eye-catching effects, and informative feedback. This approach is highly effective in WordPress because it doesn’t require complex plugins or heavy coding. It leverages the inherent flexibility of CSS to achieve impressive results.
Benefits of Using CSS Animations
CSS animations contribute significantly to improving user experience on WordPress websites. They elevate the visual appeal of your site, making it more engaging and memorable for visitors. The subtle movements and transitions that animations create can guide users effortlessly through your site, emphasizing key elements and improving navigation. Furthermore, animations can communicate important information or feedback to users in a more visually appealing way.
Want to jazz up your WordPress site with smooth CSS animations? It’s surprisingly easy! Just a few lines of code and you’re good to go. Knowing how to effectively generate leads, like what every managing partner needs to know about lead generation , is equally important for any business. Once you’ve got the lead generation process down, you can focus on making your site’s animations look awesome.
Check out some tutorials online for some simple animation ideas.
Consider how animations can help convey a sense of progress or highlight interactive elements.
Responsive Design Considerations
Ensuring your animations work flawlessly across different screen sizes is crucial for a positive user experience. Animations should adapt smoothly to various devices, from desktops to mobile phones. This means meticulously crafting your CSS animations to handle different viewport sizes without sacrificing their effectiveness. Responsive design principles should be central to your animation design, as this ensures that the animations remain visually appealing and functional across all devices.
A non-responsive animation can disrupt the user flow and decrease the perceived quality of your website.
Adding CSS animations to your WordPress site is super easy! You can use simple selectors and keyframes to create smooth transitions and eye-catching effects. Want to take it a step further and add a cool number count animation? Check out this helpful guide on how to show a number count animation in WordPress for inspiration on how to add that extra pizzazz to your website.
Once you understand those fundamentals, you’ll be able to create a wide variety of animations with ease.
Common Use Cases for CSS Animations
CSS animations find widespread application in enhancing the user experience on WordPress sites. Common use cases include:
- Page Transitions: Smooth transitions between different pages of your site can enhance the navigation experience. Imagine a subtle fade-in or slide-out effect to make page loading feel seamless and more engaging.
- Button Hover Effects: Animated hover effects on buttons can make your site more interactive. For instance, a button could slightly scale or change color when the user hovers over it, providing a visual cue to the user’s interaction.
- Loading Indicators: Animated loading indicators can provide users with a visual representation of page loading. A subtle spinning circle or a progressing bar can keep users informed and engaged during page loading.
Comparison of Animation Techniques
Different CSS animation techniques offer varying degrees of control and complexity. Choosing the right technique depends on the specific animation you want to achieve. This table summarizes the key differences between keyframes and transitions:
| Technique | Description | Advantages | Disadvantages |
|---|---|---|---|
| Keyframes | Define the starting and ending states of an animation, allowing for complex and intricate movements. | High degree of customization and control over the animation; can create complex animations with precise timing and easing functions. | More complex to implement than transitions, requiring more code to define the intermediate stages of the animation. |
| Transitions | Smoothly transition between two states of an element (e.g., a change in color or size). | Simple to implement; suitable for basic animations that involve smooth changes between two states. | Limited control over the animation’s timing and intermediate stages compared to keyframes. Less suitable for complex, multi-stage animations. |
Essential WordPress Plugins and Tools: How To Easily Add Css Animations In WordPress

Adding CSS animations to your WordPress site can significantly enhance its visual appeal and user experience. However, manually implementing these animations within your theme’s CSS can be time-consuming and complex. Thankfully, several WordPress plugins streamline this process, allowing you to add animations with minimal coding.This section explores popular plugins designed for adding CSS animations, providing installation and configuration steps, and methods for choosing the right plugin for your needs.
We’ll also delve into integrating plugins with existing themes and comparing their functionalities.
Popular WordPress Animation Plugins, How to easily add css animations in wordpress
Several plugins cater to adding CSS animations to WordPress websites. These plugins typically offer a user-friendly interface for creating and managing animations, eliminating the need for extensive coding.
Adding CSS animations to your WordPress site is surprisingly straightforward. You can easily achieve cool visual effects without needing complex coding. To really optimize your website’s performance, understanding key Facebook metrics like engagement, reach, and website clicks, which you can learn more about here: three facebook metrics to track , is crucial. This knowledge, combined with a well-designed animation, can significantly boost your site’s engagement.
After all, a visually appealing website is a more engaging one, and that’s the goal when adding CSS animations.
- WP Animation Plugin: This plugin offers a range of animation effects, from simple fades to more complex transitions. It provides a visual editor for easily creating animations, making it suitable for both beginners and experienced users. The plugin allows customization of animation duration, delay, and other parameters.
- Advanced Custom Fields with Animation Options: For sites with complex animation requirements, Advanced Custom Fields (ACF) can be combined with animation plugins. ACF allows you to create custom fields within WordPress posts and pages. You can then use these fields to control the animation parameters, such as triggering animations based on specific content. This approach provides highly granular control, particularly useful for websites with unique or dynamic content.
- Elementor Pro: If your website utilizes Elementor page builder, Elementor Pro often includes animation features directly within the page builder interface. This allows you to add animations to individual elements, such as headings, buttons, or images, directly through the visual editor, simplifying the animation process.
- Gravity Forms: For forms, Gravity Forms offers animations that enhance the user experience. The animations can be customized and applied to specific form elements.
Installing and Configuring Animation Plugins
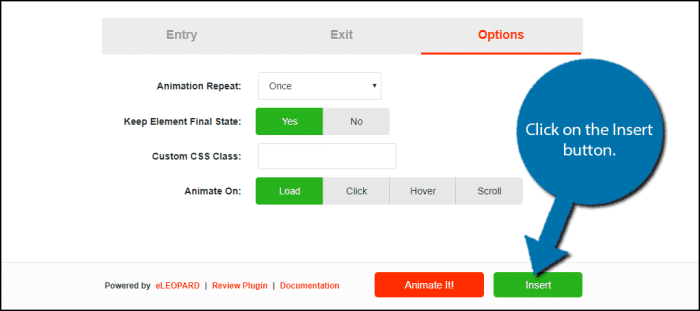
The installation process for most WordPress plugins is straightforward. Typically, you navigate to the Plugins section in your WordPress dashboard, click “Add New,” and search for the desired plugin. Once installed, activate the plugin and follow the plugin’s specific configuration instructions. These instructions will usually involve a user interface for defining animation types, durations, and triggers.
Selecting the Right Plugin
The best plugin choice depends on your specific animation needs. Consider the complexity of the animations you want to implement. If simple animations are sufficient, a basic plugin might suffice. For more complex animations, a plugin with advanced customization options might be necessary.
Integrating Plugins with Existing Themes
Most WordPress animation plugins are designed to be compatible with various themes. However, there might be occasional conflicts. Carefully review the plugin documentation to ensure compatibility with your current theme. If conflicts arise, you might need to adjust CSS styles or modify theme files to resolve any issues.
Comparing Plugin Features
Different plugins offer varying degrees of customization and functionality. Some plugins might focus on a limited set of animation types, while others provide a more comprehensive range of options. Compare plugins based on their features, pricing, and user reviews to find the best fit for your project. This comparison helps to assess the extent of customization and features provided by each plugin, such as the animation types, duration controls, and ease of use.
Direct CSS Animation Implementation
Adding animations directly within your WordPress theme’s CSS file offers granular control and customization. This approach allows for precise styling and animations tailored to specific elements without relying on plugins, potentially improving site performance. This method is particularly useful for simple animations and those needing close integration with your theme’s design.Directly manipulating your theme’s `style.css` file provides a powerful way to embed animations.
This approach allows for greater control over animation timing, complexity, and responsiveness, making it well-suited for designers wanting intricate animations. This detailed approach allows for customization beyond what plugins typically offer.
Embedding Animations in style.css
The `style.css` file, a cornerstone of WordPress theme development, serves as the central repository for styling. Embedding animations within this file involves adding specific CSS animation properties to the selectors targeting the desired elements. Careful consideration of element targeting is essential to avoid unintended animation effects on unrelated elements. Use the specificity rules of CSS to target elements precisely.
Implementing Animations Using CSS
Directly writing CSS animation rules into `style.css` offers a straightforward way to add dynamic visual effects to your WordPress website. This method provides full control over animation parameters, offering a highly customizable solution for developers. Understanding CSS animation properties is crucial for effectively integrating animations.
CSS Animation Code Snippets
Here are some examples demonstrating various animation effects:
- Fade-in animation: This animation gradually makes an element appear on the screen.
.fade-in animation-name: fadeIn; animation-duration: 1s; animation-timing-function: ease-in-out; @keyframes fadeIn from opacity: 0; to opacity: 1; - Slide-in animation: This effect smoothly slides an element into view.
.slide-in animation-name: slideIn; animation-duration: 0.5s; animation-timing-function: ease; @keyframes slideIn from transform: translateX(-100px); to transform: translateX(0); - Scale animation: An animation that makes an element appear to scale up or down.
.scale-up
  animation-name: scaleUp;
  animation-duration: 1s;
  animation-timing-function: ease-in;


@keyframes scaleUp
  from
    transform: scale(0.5);

  to
    transform: scale(1);
Targeting Specific Elements
Effective animation relies on precisely targeting the elements you want to animate. CSS selectors allow you to target elements with specific attributes, classes, IDs, or relationships to other elements.
- Class selectors: Targeting elements with specific class names. Example: `.button` to target all elements with the class “button”.
- ID selectors: Targeting elements with specific IDs. Example: `#hero` to target the element with the ID “hero”.
- Element selectors: Targeting elements based on their HTML tag name. Example: `h1` to target all `
` elements.
- Descendant selectors: Targeting elements that are descendants of another element. Example: `nav ul li` to target list items within a navigation menu.
Common CSS Animation Properties
This table details common CSS animation properties and their effects:
| Property | Description | Example |
|---|---|---|
animation-name |
Specifies the name of the animation to use. | fadeIn |
animation-duration |
Specifies the length of the animation in seconds. | 1s |
animation-timing-function |
Specifies the speed curve of the animation. | ease-in-out |
animation-iteration-count |
Specifies the number of times the animation should run. | infinite |
animation-direction |
Specifies the direction of the animation. | alternate |
Animation Integration with WordPress Widgets
Animating WordPress widgets can significantly enhance user experience, drawing attention to key information and making your site more engaging. By strategically applying CSS animations, you can transform static elements into dynamic components, boosting visual appeal and improving overall site aesthetics. This section will delve into how to effectively integrate animations into various widget types within your WordPress site.
Integrating animations into your WordPress widgets requires a thoughtful approach. It’s crucial to consider not only the animation itself but also how it interacts with the overall layout and functionality of the widget. Carefully chosen animations can elevate your site’s visual hierarchy and improve user engagement, while poorly implemented animations can be distracting and detrimental.
Applying Animations to Standard Widgets
Adding animations to standard WordPress widgets, such as the text widget, involves targeting the specific HTML elements within the widget using CSS. Identifying the elements you want to animate is the first step. Once identified, you can apply CSS animations to those elements using selectors, transitions, and keyframes. Using appropriate CSS selectors ensures that animations are applied only to the desired elements and not to other parts of your site.
- Text Widgets: You can animate text appearing or fading in and out, or even use a sliding effect to highlight specific words or phrases. Targeting the `p` or `span` elements containing the text content allows you to apply animations such as fade-in, slide-in, or a custom animation sequence.
- Image Widgets: Animations can make image displays more captivating. Transitions can be used to create smooth image reveal effects, while keyframes can be employed to produce more complex animations, such as an image rotating or bouncing in place.
- Calendar Widgets: Animations can enhance the calendar experience by smoothly highlighting the current day or upcoming events. Using CSS transitions for smooth changes in color or opacity, or keyframes to produce a sliding effect for events, can create a more engaging calendar experience.
Implementing Animations with Custom Widgets
Custom widgets provide more flexibility for animation integration. The crucial step is understanding the HTML structure of your custom widget. This structure determines the targeting points for your animations. Knowing the HTML structure of your custom widget allows for precisely targeting the elements that require animation.
- Understanding Widget Structure: Carefully examine the HTML generated by your custom widget. This is where the animation targets lie. Understanding the structure allows you to apply CSS animations to elements within the widget. This structure dictates how your animations are applied and which elements are affected.
- Targeting Specific Elements: Once the widget structure is understood, identify the elements that require animation. This involves using CSS selectors to precisely target those elements, enabling targeted animations. This ensures that animations are applied only to the intended elements and not unintentionally to other parts of your site.
- Custom Animation Sequences: Design custom animation sequences using CSS keyframes. Create tailored animations to match your widget’s function and design, making your widget visually appealing and engaging. These custom animations can create a unique and interactive experience for users.
Maintaining Animation Consistency Across Widgets
Ensuring consistent animation styles across all widgets is crucial for a cohesive user experience. This involves creating a unified animation style guide. A consistent animation style guide ensures a uniform user experience.
- Establishing a Style Guide: Documenting the animation styles for all widgets will help maintain consistency. A style guide helps you maintain consistent animations across all widgets, providing a visual template for future animation development.
- Using CSS Classes: Create CSS classes for common animation effects. This reduces redundancy and improves maintainability. This approach helps avoid repetition and improves maintainability.
- Animation Timing and Duration: Maintain consistent animation timings and durations across widgets. This helps ensure a harmonious user experience.
Animation Structure for Custom Widget Elements
A structured approach to animation implementation for custom widgets is essential. This involves defining a clear structure for applying animations.
- Dividing Elements into Classes: Group elements within your widget into CSS classes for easier targeting. This improves code readability and maintainability.
- Animation Classes: Create specific classes for animations. This separation allows you to easily switch or modify animations without affecting other widget elements.
- Applying Animations: Apply animations to elements using the defined classes. This approach allows for the seamless application of animation styles.
Responsive Animation Design
Animating elements on your WordPress site should feel seamless across different screen sizes. Responsive design ensures a consistent user experience whether the visitor is browsing on a desktop computer, tablet, or smartphone. This approach involves adapting animations to various screen resolutions and orientations, preventing jarring transitions or unexpected behavior.
Responsive animations in WordPress aren’t just about making things look good; they’re crucial for maintaining a positive user experience and enhancing engagement. Users expect a smooth and intuitive experience on all devices, and poorly designed animations can lead to a negative impression of your website.
Media Queries for Adaptive Animations
Adapting animations to different screen sizes is achieved primarily through CSS media queries. These queries allow you to target specific screen dimensions and apply different styles, including animation properties, to various devices. This precise control over animation behavior across resolutions ensures a harmonious user experience.
- Targeting Specific Screen Sizes: Media queries use conditions like
@media (max-width: 768px) ...to define styles for screens with a maximum width of 768 pixels. This is often used for adapting animations on tablets and smaller screens. Using@media (min-width: 1024px) ...allows for unique styles and animation behaviors for larger screens like desktops. - Adjusting Animation Timing: The duration of an animation can be adjusted based on screen size. For instance, a smoother animation on a larger screen might have a longer duration, while a more concise animation is suitable for smaller screens. This ensures a consistent user experience while optimizing for different display sizes.
- Modifying Animation Properties: Animations can have their properties altered based on screen size. For example, the easing function (the way the animation transitions) could be adjusted to be more fluid on larger screens and more concise on smaller ones. This can improve the overall experience by maintaining animation quality without compromising display.
Cross-Browser Compatibility
Animations can behave differently across various web browsers. Ensuring compatibility means ensuring animations function predictably in all major browsers like Chrome, Firefox, Safari, and Edge. This consistency is vital for a positive user experience, preventing jarring visual inconsistencies across platforms.
- Using Modern CSS Features: Using modern CSS animation properties, like `animation-timing-function`, `animation-duration`, and `animation-iteration-count`, is essential. Modern browsers support these properties for smoother, more complex animations.
- Testing Across Browsers: Use browser developer tools (e.g., Chrome DevTools, Firefox Developer Tools) to inspect how your animations render in different browsers. Look for any unexpected behavior or rendering issues. Tools like caniuse.com help identify browser support for specific CSS properties.
- Fallback Techniques: If you need to support older browsers that might not fully support your chosen animation, you can create a fallback animation using JavaScript or other techniques.
Animation Performance Optimization
Optimizing animation performance is critical for a positive user experience, particularly on slower devices or those with limited processing power. Performance issues can lead to stuttering, delays, and a generally unpleasant experience.
- Reducing Animation Complexity: Avoid overly complex animations with numerous transitions and transformations. Keep animations concise and relevant to the user interaction.
- Using CSS Transitions Instead of Animations: For simple animations, consider using CSS transitions, which are often faster and more efficient than full CSS animations.
- Optimizing Image Sizes: Ensure images used in animations are optimized for web use, avoiding large file sizes that can slow down page loading and animation performance.
Animation Testing and Debugging
Thorough testing is essential to ensure animations function correctly across various devices and browsers. This process helps to catch and resolve any unexpected behavior before it affects your users.
- Using Browser Developer Tools: Inspect the animations using the browser’s developer tools. Identify any inconsistencies or performance bottlenecks in the animation.
- Emulating Different Devices: Use browser developer tools or dedicated testing tools to emulate different screen sizes, resolutions, and device capabilities.
- User Testing: Incorporate user feedback to assess the animation’s effectiveness and identify any usability issues that arise from the animations on various devices.
Advanced Animation Techniques
Adding simple animations with CSS is great, but for more complex and dynamic effects, JavaScript libraries become invaluable. They allow for intricate interactions and intricate timing that CSS alone can’t always achieve. This section delves into the realm of JavaScript-driven animations in WordPress, examining their advantages and disadvantages, and providing practical examples.
JavaScript, when used correctly, can significantly enhance the user experience by creating engaging and dynamic animations that react to user actions or changes in the page’s state. However, integrating JavaScript libraries into a WordPress site requires careful consideration, as it can potentially impact website performance if not implemented efficiently.
JavaScript Libraries for Animations
JavaScript libraries such as GSAP (GreenSock Animation Platform) and Anime.js provide a wide array of tools for creating sophisticated animations. These libraries offer more control over timing, easing functions, and interactions than CSS alone. They allow for complex animations that respond to user input or data changes, adding a dynamic layer to WordPress websites.
Advantages of Using JavaScript for Animations
Using JavaScript libraries provides significant advantages for creating intricate animations. These include precise control over timing, complex interactions, and the ability to create animations that respond to user input. GSAP, for example, offers a rich set of features for advanced animation control, making it ideal for elaborate transitions and effects. Anime.js, another popular choice, offers a more streamlined approach for simple to moderate animations, while still providing powerful options.
- Precise Control over Timing and Interactions: JavaScript libraries allow for intricate timing curves, easing functions, and interactions with user input or other elements. This enables a wide range of dynamic and responsive animations. For example, a scroll-triggered animation using GSAP would smoothly animate an element’s position or opacity as the user scrolls down the page.
- Complex Animations and Interactions: JavaScript empowers you to create complex sequences of animations and interactions that would be difficult or impossible to achieve with CSS alone. Imagine an animation where multiple elements respond in a synchronized fashion to a user’s mouse movement or a page load.
- Responsive and Dynamic Animations: JavaScript-driven animations can respond dynamically to changes in the page’s state, such as resizing, scrolling, or user interactions. This responsiveness ensures that the animation adapts to different screen sizes and user actions, creating a consistent user experience.
Disadvantages of Using JavaScript for Animations
While JavaScript libraries provide powerful animation capabilities, they also come with potential drawbacks. Increased complexity can lead to slower page load times, especially if the animations are extensive or poorly optimized. Understanding how to implement JavaScript animations efficiently is crucial for maintaining website performance.
- Potential for Increased Complexity: Implementing JavaScript animations can be more complex than CSS animations, requiring a deeper understanding of JavaScript and potentially introducing more points of failure. A poorly written or optimized JavaScript animation can introduce performance issues or unexpected behaviors.
- Potential Performance Impact: If not implemented correctly, JavaScript animations can significantly impact page load times and responsiveness. This is especially true if the animation is extensive or involves complex interactions. Carefully considering the scope and optimization strategies for the animations is critical.
- Learning Curve: Understanding JavaScript and the relevant libraries, like GSAP or Anime.js, requires a learning curve that can be steeper than CSS animations. This necessitates a time investment in learning the library’s specific syntax and functionalities.
Example: Cascading Animation with GSAP
A cascading animation effect, where elements animate sequentially, can be elegantly achieved using GSAP. Imagine a header section where different elements, such as the logo, title, and tagline, appear one after another with a subtle delay, creating a visually engaging entry animation.
“`javascript
// Example using GSAP
gsap.from(“.logo”, duration: 1, y: -50, ease: “power2.out”, delay: 0.2 );
gsap.from(“.title”, duration: 1, y: -50, ease: “power2.out”, delay: 0.4 );
gsap.from(“.tagline”, duration: 1, y: -50, ease: “power2.out”, delay: 0.6 );
“`
This code snippet demonstrates how to use GSAP to animate the logo, title, and tagline elements sequentially. Each element is animated downwards from an initial position off-screen, with a staggered delay.
This creates a cascading effect, enhancing the visual appeal of the header section. The `y` property controls the vertical position, `duration` defines the animation time, `ease` specifies the animation curve, and `delay` sets the staggered appearance.
Best Practices and Troubleshooting
Adding CSS animations to your WordPress site can significantly enhance user experience, but it’s crucial to implement them effectively. Poorly written animations can lead to performance issues, conflicts with other elements, and a frustrating user experience. This section Artikels best practices and troubleshooting strategies to ensure smooth and maintainable animations.
Effective animation implementation requires a balance between visual appeal and website performance. By adhering to best practices, you can avoid common pitfalls and create animations that are both engaging and efficient.
Efficient CSS Animation Writing
Writing efficient CSS animations involves prioritizing code clarity and reducing unnecessary complexity. Using appropriate naming conventions for class names, variables, and animation properties makes the codebase easier to maintain and debug. For example, using a prefix like “animate-” for animation classes improves code readability. Avoid overly complex animations that involve numerous keyframes or excessive transitions. Consider the impact of animation on page load time.
Use CSS variables for animation properties like duration and delay to allow for easy adjustments without needing to edit the code multiple times. Keep your animation stylesheets organized and well-commented for future maintenance.
Troubleshooting Common Issues
Animation-related issues can stem from various factors. Understanding common problems and their solutions is key to smooth animation implementation.
- Animation Conflicts with Other Elements: Animations can sometimes conflict with other elements on your WordPress site, leading to unexpected behavior. This is often due to z-index issues or overlapping elements. Carefully consider the z-index values for animated elements to ensure they appear correctly above or below other content. Inspect the stacking order of elements in your browser’s developer tools.
Adjust z-index values to control the display order of elements, ensuring animations appear as intended.
- Performance Optimization: Animations that are not optimized can significantly impact website performance. Excessive animations, particularly complex ones, can lead to slow loading times and a poor user experience. Prioritize animations that enhance user engagement without sacrificing website speed. Optimize animations by minimizing the number of keyframes and transitions, using efficient animation timing functions, and using CSS variables for animation parameters.
Compressing animation files or using image sprites to reduce file sizes also helps improve page load time.
- Debugging CSS Animation Problems: When animations aren’t behaving as expected, thorough debugging is crucial. Inspecting the animation in your browser’s developer tools is a key step. Use the browser’s developer tools to identify errors, slowdowns, or conflicts with other elements. Pay attention to timing functions, delays, and transitions. Utilize console messages to track animation progress or any error messages during execution.
By meticulously inspecting the animation in your browser’s developer tools, you can identify the root cause of any issues and apply the appropriate solutions.
Resolving Animation Conflicts
Animation conflicts often arise when animated elements interact with other WordPress elements.
- Z-index Management: Z-index values determine the stacking order of elements. By carefully managing z-index, you can prevent animations from overlapping or hiding other elements. Correctly assigning z-index values for both animated and static elements is crucial for avoiding visual glitches and maintaining the intended layout. This ensures animations do not obscure or overlap with other important elements.
- Event Handling and Animations: If animations are triggered by events, ensure the event handlers and animation code don’t interfere with each other. Consider using event listeners and callback functions to manage animation triggers and ensure smooth transitions. Carefully inspect event handling code and animation logic to avoid unwanted side effects.
Summary
In conclusion, adding CSS animations to your WordPress website is a powerful way to enhance user engagement and visual appeal. By mastering the techniques covered in this guide, you’ll be able to transform static pages into dynamic, visually compelling experiences. From understanding core animation principles to leveraging plugins and responsive design, you’ll gain a comprehensive understanding of how to integrate captivating animations into your WordPress site, improving user experience and standing out from the crowd.