

How to delete post in WordPress? This guide dives deep into the various methods for removing unwanted content from your WordPress site, whether you’re an admin, author, or just need to tidy up your blog. From simple dashboard deletions to advanced SQL techniques, we’ll cover everything you need to know to confidently manage your WordPress posts.
We’ll explore different scenarios where post deletion is necessary, from removing outdated content to handling mistakes. Understanding the different methods and their implications is key, so we’ll examine the pros and cons of each approach. This comprehensive guide includes detailed steps for both individual and bulk deletions, ensuring you can tackle any post management task with ease.
Introduction to WordPress Post Deletion

WordPress, a popular content management system (CMS), empowers users to create and manage websites easily. A crucial aspect of website management is the ability to delete unwanted or outdated content. Understanding the various methods for deleting WordPress posts is essential for maintaining a clean and organized website, especially when dealing with content that no longer serves its purpose or needs to be removed due to errors or legal issues.
Deleting a WordPress post is straightforward. Just navigate to the post you want to remove and click the “Trash” button. However, if you’re prepping for the holiday season and managing your Amazon FBA inventory, you’ll need to consider amazon fba inventory limits for holiday 4 steps to prepare now to avoid any stock issues. Once you’ve got your Amazon inventory in order, remember to empty the trash to permanently delete the post.
This article explores the different post deletion methods, considering user roles and their implications.Deleting posts is a necessary task for maintaining a website’s integrity and consistency. This could involve removing inaccurate information, handling legal requests, or simply updating outdated content. A well-defined strategy for post deletion ensures that your website remains efficient and effective. Understanding the proper methods for deleting posts is crucial for preventing accidental data loss and maintaining a streamlined workflow.
WordPress Post Deletion Methods
WordPress offers various methods for deleting posts, tailored to different user roles. The appropriate method depends on the user’s access level and the nature of the deletion.
Methods for Admin Users
Admin users, possessing the highest level of access, have the most comprehensive control over post deletion. They can delete posts in bulk, utilizing advanced filtering options. Directly accessing the post’s individual page and selecting the “Delete” option is another common method. This direct approach is ideal for targeted deletions, allowing administrators to quickly and efficiently remove specific content.
Methods for Author Users
Authors, with limited administrative rights, can delete only their own posts. This restriction prevents unintentional deletion of content created by other users. The author can locate the post in the post management dashboard, and select the “Delete” option from the post’s individual page.
Methods for Other User Roles
Other user roles, like editors or contributors, have even more restricted access and cannot delete posts. This level of control is crucial for preventing unintended data loss.
Comparison of Deletion Methods
| Method | Pros | Cons | Suitable User Role |
|---|---|---|---|
| Direct Delete (Individual Post) | Fast and efficient for targeted deletions. Easy to understand. | Limited to a single post at a time. | Admin, Author |
| Bulk Delete (Multiple Posts) | Efficient for removing multiple posts quickly. Filters available for specific criteria. | Requires more technical understanding of filtering criteria. Risk of unintended deletion. | Admin |
Deleting Posts Through the WordPress Dashboard
Deleting a WordPress post is a straightforward process, crucial for maintaining content accuracy and organization. Knowing how to delete posts efficiently is essential for any WordPress user, whether a seasoned blogger or a novice. This section will guide you through the steps involved in deleting posts directly within the WordPress admin dashboard.The WordPress dashboard offers a user-friendly interface for managing various aspects of your website, including post deletion.
This streamlined approach allows for quick and easy removal of unwanted or outdated content. Properly deleting posts prevents clutter and ensures your website remains well-organized and easy to navigate.
Deleting a WordPress post is straightforward, just navigate to the post and click “trash.” But if you’re looking to handle files more effectively within your WordPress site, you might want to explore creating a file upload form. This will allow users to directly upload files to your site, which is a useful addition to many blogs. Learning how to create a file upload form in WordPress can be a valuable skill, how to create a file upload form in wordpress , and will give you more control over file management.
Once you’ve got the file upload sorted, you can easily return to deleting your posts when needed.
Locating and Selecting the Post
To initiate the deletion process, you must first locate the specific post you intend to remove. WordPress provides multiple ways to find the post you want to delete. Using the search function, you can filter posts by title, author, or date. This helps in quickly zeroing in on the desired post.Alternatively, browsing through the post list is also a viable option.
This is useful when you’re looking for a post within a specific category or by reviewing the post’s publication date. The dashboard’s intuitive post listing allows you to identify and select the appropriate post.
Steps for Deleting a Post
This detailed step-by-step guide ensures a smooth and efficient deletion process.
- Log in to your WordPress dashboard.
- Navigate to the “Posts” section. This is usually located in the left-hand navigation menu.
- Locate the post you wish to delete. You can use the search bar or browse the list of posts.
- Click on the post title to view its details.
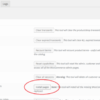
- In the post editor, locate the “Trash” option. This button is usually displayed as a button or a link in the top menu bar or toolbar within the post edit page. Click on the “Trash” option to move the post to the trash.
The Significance of the Trash
The “trash” in WordPress acts as a temporary holding area for deleted posts. This is a crucial feature because it allows you to restore a post if you accidentally delete it or change your mind. This temporary storage is an invaluable safety net, allowing you to reconsider your deletion.
Permanently Deleting Posts from the Trash
Once a post is moved to the trash, it’s not immediately gone. It stays there until you permanently delete it. To permanently remove deleted posts, you need to empty the trash.
Emptying the Trash
The trash can be emptied in several ways.
- Navigate to the “Posts” section in your WordPress dashboard.
- Look for the “Trash” sub-menu or link, usually on the left-hand navigation menu.
- Click on “Empty Trash.” This action will permanently delete all posts currently in the trash. This action cannot be undone.
Deleting Posts via Plugins
Sometimes, the built-in WordPress post deletion tools might not suffice for your needs. This is where dedicated plugins come in handy. They can offer advanced features, streamline the process, and even integrate with other aspects of your website. This section dives into the world of WordPress plugins designed specifically for post deletion.Plugins provide an alternative and often more comprehensive approach to deleting posts, enabling a wider range of customization and control over the deletion process.
They frequently offer features like batch deletion, selective criteria for deletion, and integration with other WordPress functionalities.
Popular Post Deletion Plugins
Several plugins offer post deletion functionalities. Some are simple tools, while others are part of broader management suites. Choosing the right one depends on your specific needs and workflow.
- Bulk Actions Plugin: This plugin extends the bulk actions available in the WordPress admin. While not solely focused on deletion, it can significantly speed up the process of deleting multiple posts simultaneously by adding new options. Its advantage is its integration with existing WordPress tools. The downside might be limited customization compared to dedicated deletion plugins.
- Advanced Custom Fields (ACF) Plugin: While primarily known for custom fields, ACF can be used to streamline post deletion. By creating custom fields for post status or a “delete” flag, ACF allows for automated deletion based on criteria. This method is suitable for users who want fine-tuned control over deletion.
- WP-Delete Posts Plugin: This plugin is a dedicated solution specifically designed for deleting posts. It likely provides advanced features for bulk deletion and potentially integrates with other WordPress functionalities. The specifics depend on the version of the plugin.
- Simple Post Deletion Plugin: This is a plugin with a straightforward approach to post deletion, offering ease of use and potentially good performance. It might be a good option for users prioritizing simplicity over advanced features. However, it might not be as flexible as other options.
Comparing Plugin Features
The effectiveness of a plugin for post deletion hinges on its features. A table comparing common features can aid your selection.
| Plugin Name | Features | Compatibility |
|---|---|---|
| Bulk Actions Plugin | Enhanced bulk actions, possibly including post deletion. | Likely compatible with most WordPress versions. |
| Advanced Custom Fields (ACF) | Custom fields enable criteria-based deletion, automated processes. | Generally compatible with recent WordPress versions. |
| WP-Delete Posts Plugin | Likely focused on post deletion, potentially including bulk deletion and other features. | Compatibility depends on the specific version of the plugin. |
| Simple Post Deletion Plugin | Simple, user-friendly interface for post deletion. | Generally compatible with recent WordPress versions. |
Installing and Activating a Plugin
The process for installing and activating a plugin is similar across most plugins.
- Locate the “Plugins” section in your WordPress dashboard.
- Click “Add New.”
- Search for the desired plugin.
- Click “Install Now.”
- Click “Activate.”
Configuring Plugin Settings
Plugin settings vary depending on the plugin. Generally, you’ll need to configure options to meet your specific needs. Common settings include bulk action options, criteria for selection, and deletion confirmation.
Conclusion
Using plugins can be an efficient way to manage post deletion in WordPress. Understanding the features and compatibility of different plugins is crucial to choosing the right one for your workflow. Remember to check the plugin’s documentation for detailed instructions and optimal configuration.
Deleting Multiple Posts
Deleting multiple posts in WordPress can save you a significant amount of time, especially when dealing with large numbers of outdated or unwanted content. This method is crucial for maintaining a clean and organized blog, ensuring only relevant content remains visible to readers. It also helps manage website resources effectively.Efficient bulk deletion is possible through the WordPress dashboard, allowing you to select multiple posts and delete them simultaneously.
This method is far more efficient than deleting posts individually, especially for large datasets. This method streamlines the process, ensuring a quick and organized approach to content management.
Selecting Multiple Posts
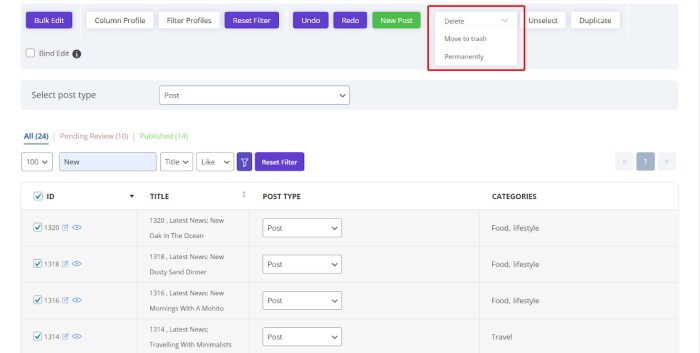
To select multiple posts for deletion, navigate to the “Posts” section of your WordPress dashboard. You’ll see a list of all your published and unpublished posts. Each post is represented by a checkbox next to its title. Clicking on this checkbox selects the individual post. To select multiple posts, hold down the Ctrl (or Cmd) key on your keyboard and click the checkboxes of the posts you want to delete.
This allows for a flexible and user-friendly selection process.
Using Bulk Actions
WordPress offers a powerful feature called “Bulk Actions” which enables you to perform the same action on multiple selected posts. This is a critical feature for efficient content management. Bulk actions significantly speed up repetitive tasks, such as deleting, editing, or changing the status of multiple posts. To initiate a bulk action, locate the “Bulk Actions” dropdown menu at the top of the post list.
Deleting Posts in Bulk
After selecting the desired posts, choose “Delete” from the “Bulk Actions” dropdown menu. This will trigger the bulk deletion process. A confirmation message will appear, asking if you are sure you want to proceed. Click “Apply” to confirm the deletion. This step ensures the accuracy of the deletion operation.
Step-by-Step Guide to Selecting and Deleting Multiple Posts
- Log in to your WordPress dashboard.
- Navigate to the “Posts” section.
- Locate the posts you want to delete and click the checkbox next to each title to select them.
- Alternatively, hold down the Ctrl (or Cmd) key and click the checkboxes of the posts you want to delete.
- In the “Bulk Actions” dropdown menu, select “Delete”.
- Click “Apply” to confirm the deletion. Be certain to double-check the selected posts before confirming.
Advanced Post Deletion Techniques: How To Delete Post In WordPress
Diving deeper into WordPress post deletion, we now explore advanced techniques. While the standard dashboard methods suffice for most cases, situations may arise where more granular control or specialized solutions are necessary. This section focuses on leveraging SQL queries, a powerful tool for manipulating data, and the critical considerations for safe and effective use.Advanced post deletion often involves situations where standard methods are insufficient or where precise control over the deletion process is required.
This could involve bulk deletions, complex criteria for selection, or the need to recover accidentally deleted data. Understanding the risks and benefits of SQL queries, along with appropriate recovery techniques, are crucial for managing WordPress content effectively.
SQL Queries for Post Deletion
SQL queries provide a powerful way to delete posts based on specific criteria. This is particularly useful for bulk deletions or situations where you need to filter posts based on date, author, or other attributes. However, direct manipulation of the database should be approached with caution. Incorrect queries can lead to data loss.
Potential Risks and Benefits of SQL for Post Deletion
Using SQL queries for post deletion offers several benefits, primarily in terms of efficiency and precision. For instance, you can delete posts that meet specific criteria, potentially saving time compared to manual selection. However, there’s a significant risk of data loss if the query isn’t carefully crafted. A single typo or incorrect condition can delete unintended posts, leading to severe consequences.
Examples of SQL Queries for Specific Post Deletion Scenarios
Here are examples of SQL queries for different scenarios. Remember to replace placeholders with your actual database credentials and specific criteria.
- Deleting all posts from a specific author:
-
DELETE FROM wp_posts WHERE post_author = ‘123’;
Deleting a WordPress post is surprisingly straightforward. Just navigate to the post you want to remove, click the ‘trash’ icon, and then confirm the deletion. Keeping your website’s content organized is crucial, and understanding how to delete posts effectively is key to a smooth workflow. A great way to monitor your website’s performance is to regularly check your keyword ranking update report , and make sure your content is optimized.
This will help you ensure you’re targeting the right keywords for your content, which will ultimately improve your site’s visibility and drive traffic. So, next time you need to clean up your WordPress blog, you’ll know exactly what to do!
- This query removes all posts authored by user ID 123. Carefully verify the user ID before running this query.
- Deleting posts published before a certain date:
-
DELETE FROM wp_posts WHERE post_date < '2023-10-26';
- This query deletes all posts published before October 26, 2023. Be sure the date format matches your database.
- Deleting posts with a specific tag:
-
DELETE FROM wp_posts WHERE ID IN (SELECT post_id FROM wp_term_relationships WHERE term_id = ‘456’);
- This query deletes posts associated with the tag ID 456. This example involves a subquery, and requires careful understanding of your WordPress database structure.
Techniques for Recovering Accidentally Deleted Posts
If a mistake is made and posts are deleted, immediate action is crucial. If possible, immediately stop the process and restore from backups. The backup process is critical to prevent data loss. WordPress plugins often provide a rollback option or data restore functions. If backups aren’t available or the issue involves an older backup, consider using database recovery tools.
Remember, the sooner you act, the higher the chance of restoring the lost data.
How to Prevent Accidental Post Deletions
To avoid accidental deletions, meticulous planning and confirmation are essential. Always double-check queries before execution, ensuring that the selection criteria are precise. Consider using version control systems or plugins designed for post management, which can track changes and offer rollback options. Using a staging site for testing SQL queries before implementing them on the live site is another crucial step to minimize the risk of unintended consequences.
Handling Different Post Types
WordPress offers a flexible system for managing content, with various post types beyond the standard “post.” Understanding how to delete these different types is crucial for maintaining a well-organized site. This section delves into the nuances of deleting posts, pages, custom post types, and other content types, emphasizing the distinct approaches and considerations for each.Deleting content in WordPress involves more than just hitting a delete button.
Different post types have varying structures and associated data, requiring specific methods to ensure complete removal without unintended consequences. This careful approach prevents orphaned data and ensures a smooth transition within your WordPress ecosystem.
Identifying WordPress Post Types
WordPress supports various post types, each serving a distinct purpose. Standard post types include “posts,” used for blog articles, and “pages,” designed for static content like “About Us” or “Contact.” Beyond these, custom post types allow you to create tailored content structures for your website, such as “products,” “events,” or “testimonials.” Understanding the different post types is fundamental to applying the correct deletion process.
Deleting Posts vs. Pages
The process for deleting “posts” and “pages” is fundamentally similar within the WordPress dashboard. However, differences in usage may influence your deletion strategy. Posts are often time-sensitive and part of a chronological feed, while pages are generally static. When deleting a page, consider whether associated links or references might need updating.
Deleting Custom Post Types
Custom post types require a slightly different approach due to their tailored structure. The deletion method often mirrors the process for standard posts or pages, depending on the specific implementation of the custom post type. Custom post types are highly customizable, meaning the deletion method might vary. Always check the documentation for the specific plugin or theme used to ensure you use the right method.
Deleting Posts with Attachments
Posts and pages often include multimedia attachments like images, videos, or documents. Deleting a post with attachments involves removing the post itself and then handling the attached files. WordPress typically provides a mechanism to delete the attachments alongside the post. Be mindful of media libraries and ensure you delete any associated files or folders.
Deleting Posts with Custom Fields
Custom fields add specific metadata to posts. When deleting a post with custom fields, these fields are also removed. The deletion process for posts with custom fields is generally automatic. However, be cautious if the custom fields are linked to other parts of your website, as deleting the post may also remove these links.
Deleting Posts with Tags and Categories
Deleting posts by tag or category involves a selective approach. You can filter posts within the WordPress dashboard based on tags or categories and then delete the selected posts. This targeted approach is useful when you want to remove posts based on their subject matter or content type.
Deletion Procedure Table
| Post Type | Deletion Steps | Considerations |
|---|---|---|
| Posts | Locate post in dashboard, click “trash,” then “empty trash.” | Ensure associated attachments are also deleted. |
| Pages | Locate page in dashboard, click “trash,” then “empty trash.” | Check for broken links or references. |
| Custom Post Types | Follow the instructions in the custom post type’s documentation. | Verify compatibility with other parts of your site. |
Error Handling and Troubleshooting
Deleting WordPress posts can sometimes lead to unexpected errors. Understanding these potential problems and how to resolve them is crucial for maintaining the integrity of your website’s content. Proper error handling ensures smooth operations and prevents data loss. This section details common issues, troubleshooting steps, and recovery methods for deleted posts.Knowing how to recover from accidental deletions is a vital aspect of WordPress management.
Proper backup procedures are a crucial part of this process. This section provides strategies for recovering deleted posts and preventing future issues.
Common Deletion Errors
Understanding the possible errors that can occur during post deletion is essential for effective troubleshooting. Common issues include permission errors, database corruption, and plugin conflicts.
- Permission Errors: Insufficient user privileges can prevent successful deletion. Users without the necessary permissions might encounter errors while attempting to delete posts. Check the user roles and permissions assigned to ensure the user has the required deletion capabilities. Incorrect user permissions lead to failed deletion attempts and error messages.
- Database Corruption: Issues with the WordPress database, such as corrupted tables, can cause problems during deletion. A corrupted database can manifest as errors during post deletion, often leading to partial or complete failure. Regular database backups are critical in mitigating this risk.
- Plugin Conflicts: Certain plugins might interfere with the post deletion process. A conflicting plugin can cause unexpected behavior during deletion, leading to errors or data loss. Deactivate or remove any potentially problematic plugins to isolate the issue and identify the conflicting plugin.
Troubleshooting Deletion Issues, How to delete post in wordpress
Effective troubleshooting involves systematically identifying and resolving the cause of deletion problems. This section provides a structured approach to diagnosing and resolving post deletion issues.
- Verify User Permissions: Ensure the user attempting the deletion has the necessary privileges. Check the user role and associated permissions in the WordPress dashboard’s Users section. Incorrect permissions are a frequent source of deletion failures.
- Check Database Integrity: Inspect the WordPress database for any corruption or errors. Use tools like phpMyAdmin or similar database management tools to examine the database structure and identify any inconsistencies. Database corruption can lead to failed deletion attempts.
- Deactivate Plugins: Temporarily disable any plugins to isolate potential conflicts. Deactivate plugins one at a time to pinpoint the plugin causing the issue. Conflicts between plugins and the post deletion process are a common source of problems.
Post Recovery Strategies
Restoring deleted posts depends on the method of deletion and the timeframe since deletion. Immediate recovery methods are more likely to succeed than attempts to recover posts that have been deleted for an extended period.
- Using Backup Tools: Restore from a recent backup to recover the deleted post. Consult your chosen backup plugin’s documentation for the restoration process. Backup tools are vital for recovering deleted content.
- Database Recovery: Employ database repair tools or techniques to attempt to recover the deleted post. Use caution when performing database repair, as improper procedures can cause further damage. Recovery tools can be used to salvage data from a damaged database.
- Contacting Support: If other methods fail, contact WordPress support or a web hosting provider for assistance. Professional help might be necessary to recover a deleted post.
Importance of Data Backup
Regular data backups are crucial for preventing data loss due to accidental deletions or other issues. Backup strategies should be a fundamental part of any WordPress website maintenance routine.
Regular backups are your best defense against accidental data loss.
Maintaining a recent backup ensures the ability to recover lost data and maintain website integrity. Without backups, recovering deleted posts becomes significantly more challenging or even impossible. The frequency of backups should depend on the rate of content updates.
End of Discussion
Deleting posts in WordPress can seem daunting, but with this comprehensive guide, you now have a powerful toolkit for managing your content effectively. We’ve covered the various methods, from simple dashboard deletions to advanced SQL techniques, providing a clear path for every user role. Remember to prioritize backups and understand the potential risks before performing any deletions, ensuring your WordPress site remains functional and secure.
By understanding the intricacies of post deletion, you’ll be empowered to confidently maintain a clean and organized WordPress blog.