How to create custom single post templates in WordPress unlocks a world of design possibilities for your website. This guide dives deep into crafting unique layouts for individual posts, going beyond the standard WordPress template. Learn how to tailor the look and feel of specific content types for a more engaging and personalized user experience.
From customizing the structure and adding custom fields to handling conditional logic and displaying related content, this comprehensive tutorial will walk you through the entire process, empowering you to build sophisticated and highly customized WordPress websites.
Introduction to Custom Post Types in WordPress
WordPress, by default, comes with a handful of post types, like posts and pages. However, for specialized content needs, these built-in types might not suffice. This is where custom post types come in handy, allowing you to create entirely new types of content tailored to your specific requirements. They provide a structured way to manage and display content beyond the standard blog post format.Custom post types are essentially new content types you define in WordPress, giving you the ability to manage different kinds of information in a more organized way.
This flexibility is crucial for websites with unique content structures, like e-commerce sites, real estate portals, or portfolios. They enhance the overall organization and management of your website’s content.
Significance of Custom Post Types
Custom post types offer significant advantages over the standard post type. They allow for tailored content management, enabling a more organized and efficient way to manage specific types of data. They are more suitable for complex content structures.
Benefits of Using Custom Post Types
- Enhanced Organization: Custom post types enable a more structured approach to content management, separating different content types into distinct categories. This separation improves the overall organization of your website, making it easier to manage and find specific information. For instance, an e-commerce site can categorize products, services, and testimonials in different custom post types.
- Tailored Functionality: Custom post types allow you to define specific fields and attributes relevant to your content. This is critical for managing unique data points. For example, a real estate site can include fields like property size, location, and price for each listing, whereas a portfolio site can include client names, project descriptions, and images.
- Specific Template Usage: You can create custom templates for each custom post type, ensuring that each type of content displays in a way that’s most appropriate for its specific needs. This approach allows you to showcase content tailored to the unique requirements of each custom post type.
Differences Between Custom Post Types and Standard WordPress Posts
Standard WordPress posts are primarily designed for blog-style content. Custom post types, on the other hand, are flexible and adaptable to different needs. Custom post types offer greater control over the structure and fields associated with the content. For example, a standard post might only include title and body content, while a custom post type for products might require additional fields like price, stock, and categories.
Learning how to create custom single post templates in WordPress can seriously boost your blog’s visual appeal. A crucial aspect of this is understanding how to implement effective blog call to action strategies. Blog call to action elements are key for driving engagement and conversions, and integrating them into your custom templates will make your posts even more dynamic.
Ultimately, these custom templates allow you to perfectly tailor your reader experience, making each post uniquely engaging and memorable.
Importance of Custom Post Templates
Creating custom templates for your custom post types is crucial for ensuring a consistent and user-friendly presentation. It allows you to design a visual representation that’s unique to each content type. Without custom templates, all custom post types would likely display in a similar way to standard posts, potentially making it difficult for users to understand the different types of content available.
Basic Structure of a Custom Post Type (Product)
- Post Type Name: “product”
- Custom Fields:
- Product Name
- Product Description
- Price
- Stock Quantity
- Category
- Image
- Custom Template: A template specifically designed to display product information in a user-friendly manner. This template would incorporate the custom fields to create a product page with the necessary details.
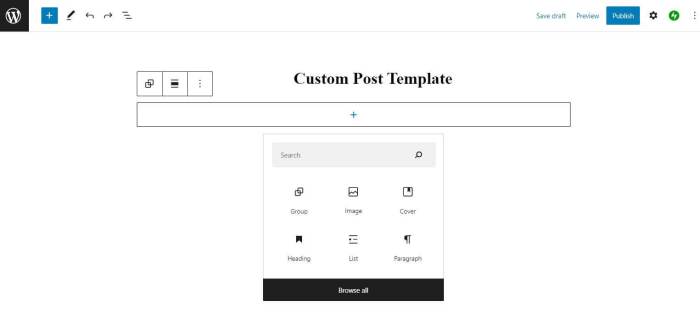
Creating Custom Post Templates
Custom post templates in WordPress empower you to tailor the display of specific post types, offering a powerful way to present content uniquely. By creating separate template files, you can customize the layout, formatting, and included elements for various post types, such as blog posts, product listings, or news articles, without affecting the general site design. This flexibility is crucial for presenting diverse content effectively.
Creating Template Files
To establish a custom template file, navigate to the themes/your-theme/ directory on your server. Within this folder, create a new PHP file. The naming convention is critical for WordPress to recognize the template.
Naming Conventions
WordPress employs a naming convention to identify and use template files. These files often correspond to specific post types or content layouts. For example, to create a template for custom posts, you might name the file single-custom-post.php. This file will be used whenever a custom post is displayed. Following a consistent naming pattern is key for organization and avoiding conflicts.
Basic Code Structure
A basic custom post template file typically begins with a standard WordPress template header. This includes the necessary opening tags and header information. The following code snippet illustrates a fundamental structure:
This structure retrieves the post title and content using template tags. The get_header() and get_footer() functions are crucial for integrating the template with the theme’s overall header and footer.
Ever wanted to tweak your WordPress single post displays? Creating custom templates is a fantastic way to add your own style and functionality. It’s a relatively straightforward process, involving modifying the template files. While you’re diving into the world of theme customization, it’s worth keeping an eye on the latest search algorithm updates, like the ones Google recently announced regarding mobile search.
Google’s announcements about changes coming to mobile search highlight the importance of mobile-friendliness, which, in turn, impacts how you structure your content and presentation. Fortunately, these changes often align with best practices for creating clean and well-organized custom single post templates.
Using Template Tags
WordPress template tags provide a structured way to access and display post data. Using these tags is essential for retrieving and formatting information within your custom template.
-
the_title(): Displays the title of the current post. -
the_content(): Displays the content of the current post. -
the_post_thumbnail(): Displays the featured image associated with the post (if available). -
get_the_date(): Displays the date the post was published. -
get_the_author(): Displays the author of the post.
Displaying Custom Fields
Beyond standard post data, custom fields provide a mechanism to store extra information related to a specific post. These fields can be accessed using template tags.
For example, let’s assume you have a custom field named “product_price.” You can retrieve its value using the following code:
Price: $' . $productPrice . '
';?>
This snippet retrieves the value of the custom field associated with the current post. It ensures the field exists before displaying it, preventing errors.
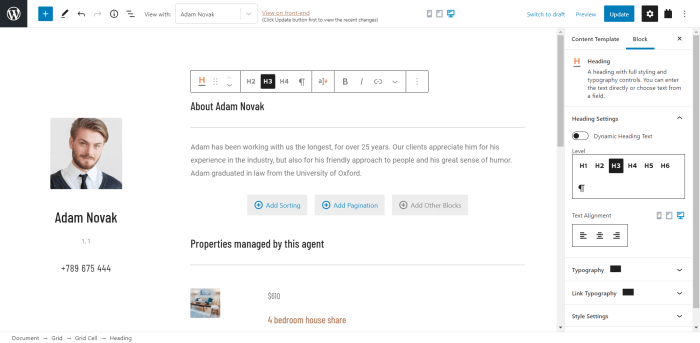
Customizing Template Structure
Customizing the structure of your custom post templates allows for a high degree of control over the visual presentation of your content. This involves modifying the layout, adding styling, integrating media, and employing conditional logic to tailor the template to specific needs. By understanding these techniques, you can create unique and engaging reading experiences for your users.This section will delve into practical methods for modifying the layout, adding custom sections, and incorporating visual elements into your custom post templates, along with using conditional logic to control content visibility.
Modifying the Layout
The layout of a custom post template is primarily defined by the HTML structure. You can change the arrangement of elements like headings, paragraphs, images, and sidebars to achieve different visual hierarchies. Adjusting the order and placement of these elements within the template file directly impacts the appearance of the post. For example, placing the featured image above the title will visually differ from a layout that places it below.
Experimentation with different HTML structures is crucial for achieving a desired visual flow.
Adding Custom Sections
Adding custom sections involves introducing new HTML elements into the template. These sections can contain any content, including custom fields, widgets, or other dynamic elements. Consider adding a section for author information, social media links, or a call to action. Each custom section needs to be carefully integrated into the overall layout to maintain visual coherence. For instance, you could add a ‘Related Posts’ section by querying for similar posts.
Using CSS for Styling
Cascading Style Sheets (CSS) are essential for customizing the visual presentation of your custom post templates. You can apply styles to individual elements, such as headings, paragraphs, or images, to create a consistent and visually appealing design. For instance, using CSS to set specific font styles, colors, and sizes for different content types helps to maintain a cohesive design aesthetic across the site.
Remember to carefully target specific elements and avoid using generic selectors to prevent unintended side effects on other parts of your website.
Incorporating Images and Media
Images and other media are crucial for enhancing user engagement and providing visual context. Templates should be designed to accommodate different types of media, such as featured images, galleries, and embedded videos. Ensure that images are properly sized and formatted to fit the layout without causing visual clutter or compromising readability. Consider using responsive design techniques to ensure images adjust correctly across different screen sizes.
Using Conditional Logic
Conditional logic allows you to control the display of content based on specific conditions. This can be used to display different content based on the type of post, the user’s role, or other factors. For instance, you might want to display a specific call to action for certain posts, or show different author information depending on the post’s author.
These conditions enhance the personalization and relevance of the content displayed on the page.
Handling Custom Fields and Meta Data
Adding custom fields to your WordPress posts allows you to store extra information specific to your content. This data can be anything from author notes to pricing details, product specifications, or any other attribute relevant to your content type. This flexibility extends beyond the standard post data, enabling a more comprehensive representation of the information you manage. This section details how to create and manage these custom fields, including displaying them in your custom post templates.Understanding how to leverage custom fields empowers you to enhance the functionality and presentation of your WordPress site.
Properly structured and displayed, custom fields enrich user experience and provide valuable data for your content management.
Creating Custom Fields
To create custom fields, you’ll use the `add_meta_box()` function. This function defines the metabox, a visual element that allows users to input data for the custom field. The function takes several parameters, including the post type, the callback function for the metabox content, and the title for the metabox.
Managing Custom Fields
Once you’ve defined your custom fields, you need to manage the data associated with them. This involves saving the data when a user submits a form and retrieving it when displaying the post. The `add_post_meta()` and `get_post_meta()` functions are crucial here.
Displaying Custom Field Data
To display the custom field data in your template, use `get_post_meta()`. This function retrieves the value of a custom field based on the post ID. You can then format and display the retrieved data in your template file. Example:“`PHP “`This code snippet fetches the value of the custom field named ‘custom_field_name’ for the current post. If the field exists and has a value, it’s displayed; otherwise, nothing is shown.
Using Custom Metaboxes
Metaboxes are user-friendly input forms within the WordPress editor. They streamline the process of adding custom field data. Use `add_meta_box()` to define a metabox.
Examples of Different Data Types
Custom fields can store various data types, including text, numbers, dates, and even file uploads. To display these different types in your template, you’ll adjust the output accordingly. Example:
- Text Field: Display text fields directly using echo.
- Number Field: Use
intval()to convert the retrieved value to an integer before displaying. - Date Field: Use WordPress’ date formatting functions to display the date in a user-friendly format.
- File Upload: Use WordPress’ file handling functions to display the file’s URL or embed it.
Validating and Sanitizing Custom Field Data
Validating and sanitizing custom field data is crucial to prevent security vulnerabilities and ensure data integrity. Here are some methods:
- Input Validation: Check for the expected data type and format (e.g., email addresses, URLs). Ensure that the data conforms to the requirements of your application.
- Sanitization: Remove or encode potentially harmful characters. Use WordPress’ built-in sanitization functions (e.g., `esc_html()`, `esc_url()`) to prevent XSS attacks.
- Data Type Conversion: Convert data to the appropriate type for use in your application (e.g., converting a string to an integer or a date).
Implementing Conditional Logic
Crafting custom post templates in WordPress often requires dynamic behavior. Conditional logic empowers you to tailor the displayed content based on various factors, such as custom field values, post categories, or even user roles. This allows for highly personalized and targeted content experiences.Conditional logic, in essence, enables you to decide what elements appear on a single post page, ensuring that the appropriate content is shown to the user.
This flexibility is critical for creating complex and user-friendly WordPress websites.
Using Conditional Statements (if/else)
Conditional statements, like `if` and `else` statements, are fundamental tools for implementing conditional logic in your templates. They allow you to evaluate a condition and execute different code blocks depending on whether the condition is true or false.
;%20?><noscript><img decoding=)
No featured image available.
This example checks if a custom field named “featured_image” exists. If it does, it displays the image; otherwise, it shows a message indicating that no featured image is present.
Displaying Content Based on Custom Field Values
Custom fields provide a powerful mechanism for storing additional data associated with your posts. Conditional logic allows you to use these values to control template output.
 100)
  echo 'This product is expensive.
'; else   echo 'This product is affordable.
';?>
This snippet checks the value of the `product_price` custom field. If the price exceeds $100, it displays a message indicating it’s expensive; otherwise, it shows a message indicating it’s affordable.
Leveraging WordPress Functions for Conditional Logic
WordPress offers numerous functions for evaluating conditions related to posts, categories, tags, and users.
This post is on sale.
This example checks if the current post belongs to the “sale” category. If it does, it displays a message confirming the sale.
Utilizing Custom Post Meta for Conditional Output
Custom post meta is another way to store data and use conditional logic to display specific content. WordPress provides functions to retrieve custom meta data and control the display.
Limited stock available.
';?>
This code retrieves the value of the `availability` custom meta field for the current post. If the value is “limited,” it displays a message accordingly.
Controlling Content Blocks Based on Post Categories or Tags
Conditional logic lets you display different content blocks depending on the categories or tags associated with a post.
slug; , $categories)))
  get_template_part('content-technology');

?>
This code snippet iterates through the categories of the current post and checks if the ‘technology’ category is present. If so, it loads a dedicated template part for displaying technology-related content.
Displaying Related Content: How To Create Custom Single Post Templates In WordPress
Enhancing user experience on your WordPress site often involves suggesting relevant content. This section delves into strategies for displaying related posts, focusing on categories, tags, custom fields, and custom queries, all while addressing pagination for a seamless user journey. The examples showcase how these techniques integrate with custom post types, offering concrete application and flexibility.
Strategies for Displaying Related Posts
Several approaches exist for displaying related content, leveraging various WordPress features. A common method utilizes categories and tags, allowing for posts with similar subject matter to be presented together. Custom fields provide another route, enabling you to link posts based on criteria specific to your content structure. This is particularly valuable for “similar products” sections on e-commerce sites.
Implementing a “Similar Products” Section
For a custom “Product” post type, a “Similar Products” section enriches the user experience. This section presents products that share characteristics with the currently viewed product. Leveraging custom fields, you can create a field (e.g., “related_products”) to store a comma-separated list of related product IDs. WordPress’s custom query capabilities are instrumental in retrieving and displaying these related products.
Custom Queries for Related Posts
WordPress’s custom query functions provide granular control over retrieving related posts. The following example demonstrates a custom query for products, based on shared categories:
 'product',
        'include' => $related_products,
        'posts_per_page' => 4, // Adjust as needed
    ));

?>
This code snippet first retrieves the related products from the custom field. Crucially, it uses the include parameter to specify the exact product IDs for retrieval. The posts_per_page parameter controls the number of related posts displayed. The code effectively targets specific posts based on their IDs, ensuring accuracy and relevance.
Implementing Pagination for Related Content
Pagination ensures that users can navigate through extensive related content without being overwhelmed. To achieve this, employ WordPress’s pagination functions. Modify the existing query to incorporate pagination parameters. This allows for a clean display of related posts across multiple pages.
 'product',
    'posts_per_page' => 4,
    'paged' => get_query_var('paged') ? get_query_var('paged') : 1, // Handle pagination
    // ... other query parameters
);
$related_query = new WP_Query($args);
if($related_query->have_posts())
	while($related_query->have_posts())
		$related_query->the_post();
		//Display the related post

	the_posts_pagination();

wp_reset_postdata();
?>
The crucial addition is the paged parameter, which dynamically adjusts based on the current page number. The the_posts_pagination() function is then used to generate the pagination links, providing a user-friendly interface for browsing related posts.
Example Integrating Custom Post Types with Related Posts
Let’s imagine a “Blog Post” custom post type with a “related_posts” custom field containing a comma-separated list of post IDs. The code would retrieve these related posts, paginate them, and display them below the original post. This showcases the versatility of custom queries for displaying relevant content in various contexts.
 'blog_post',
      'include' => $related_posts,
      'posts_per_page' => 3,
      'paged' => get_query_var('paged'),
  );
  $related_query = new WP_Query($args);
  //Display related posts with pagination

?>
Using WordPress Hooks and Filters

WordPress hooks and filters are powerful mechanisms for extending and modifying the core functionality of WordPress, including custom post templates.
They allow developers to inject their own code at specific points in the WordPress workflow, offering granular control over template output and data manipulation. This flexibility is crucial for creating dynamic and personalized content experiences.
Hooks and filters are fundamental to WordPress’s extensibility. They enable developers to alter the behavior of various actions and filters without directly modifying core WordPress files, ensuring a clean and maintainable codebase. This modular approach significantly reduces conflicts and promotes code reusability.
Modifying Custom Template Output with Hooks
Hooks provide a way to intercept and modify actions within WordPress. This is particularly useful for adding custom logic to your custom post templates. For example, a hook can be used to alter the HTML structure of a specific post type. The ‘the_content’ hook, for instance, allows you to modify the content displayed on a post page.
Customizing Post Output Using Filters
Filters allow for the modification of data before it’s displayed in the template. A filter might be used to change the output of a custom field, or format the date displayed on a post. The ‘the_content’ filter can be used to add formatting or modify the content itself. This capability allows for significant customization, like adding specific styling or formatting to content elements.

Examples of Custom Functionality with Hooks and Filters
- To add a custom message before the content of a specific post type, use the
the_contenthook. A simple example might involve displaying a message for a ‘promotion’ post type, highlighting a special offer or discount. You would place your code within the hook function to display the message. A similar method can be used to add special styles for specific types of posts.By adding the conditional logic based on post type, the message will only appear for the appropriate posts.
- To modify the displayed author information on a custom post type, use a filter on the author’s display. This could be used to display a custom profile link or a different title for the author.
- For enhancing the display of related content, a filter can be applied to the output of the related posts query. This allows for specific formatting or adjustments to the displayed posts, potentially using different styling, or custom criteria for the related post display.
Best Practices for Using Hooks and Filters
- Prioritize clarity and maintainability. Write well-documented code, using descriptive variable names and comments. This is essential for future development and maintenance. This is critical for readability and modification, ensuring code can be understood and updated effectively.
- Use the correct hook/filter for the task. Avoid using a general hook if a more specific one exists. This promotes efficiency and reduces the potential for unintended consequences.
- Keep hooks and filters focused on a single task. Overly complex hooks can lead to issues with debugging and maintainability. This modular approach leads to cleaner code and more manageable tasks. For instance, if a hook is for displaying content, it should not also handle styling or other unrelated tasks.
- Use appropriate WordPress functions and filters. Leveraging built-in WordPress functions enhances compatibility and reduces potential conflicts. This is critical for maintaining the integrity of your theme and plugins.
Example: Adding a Custom Field to Post Output, How to create custom single post templates in wordpress
To add a custom field, “event_date,” to the post output, use a filter. The filter will modify the post content display to include the event date before the regular post content. This can be done by creating a filter that checks for the presence of the custom field and, if found, adds it to the output before the main content.
Responsive Design Considerations
Custom post templates should be designed with responsiveness in mind to ensure optimal viewing across various devices and screen sizes. This involves tailoring the layout and presentation to adapt seamlessly to different resolutions, from small mobile phones to large desktops. Failing to consider responsiveness can lead to a poor user experience and decreased accessibility for readers.
Responsive design in custom post templates goes beyond just making the text readable on smaller screens. It’s about adjusting the entire layout, including images, sidebars, and content areas, to fit the available space efficiently and effectively. This ensures that the information remains easily accessible and visually appealing, regardless of the device being used.
Implementing Media Queries
Media queries are crucial for achieving responsive design in custom post templates. They allow you to apply different styles based on the characteristics of the user’s device, such as screen width and orientation. By using media queries, you can precisely control how elements of your custom post template behave at different screen sizes.
Example:
@media (max-width: 768px)
  .container
    width: 90%;
    margin: 0 auto;

  .sidebar
    float: none;
    width: 100%;
    margin-bottom: 20px;

  .content
    width: 100%;
    padding: 0;
This example shows how media queries can be used to adjust the width of the container, the positioning of the sidebar, and the padding of the content area for smaller screens (max-width: 768px).
This is a common breakpoint, but it’s important to tailor the breakpoints to your specific design and content.
Best Practices for Mobile-Friendliness
Prioritize a clean and simple layout on mobile devices. Avoid overly complex designs that can be difficult to navigate or understand on smaller screens. Ensure sufficient spacing between elements to prevent overcrowding and make it easier for users to read and interact with the content. Use large, legible fonts and clear visual hierarchy to improve readability. Image optimization is critical.
Use appropriate image sizes and formats to prevent slow loading times.
Figuring out custom single post templates in WordPress can be a game-changer for your blog’s design. Knowing how to tailor these templates allows you to really personalize your site’s look and feel, and make it stand out from the crowd. But before you dive into the code, it’s also helpful to consider the ideal number of blog posts to write per week the ideal number of blog posts to write per week.
Understanding this will help you set realistic goals and maintain a consistent posting schedule, which is key for both audience engagement and search engine optimization. Ultimately, crafting custom single post templates in WordPress is a powerful tool to help you build a blog that’s both visually appealing and effective.
Responsive Column Structure
The following table demonstrates how to structure responsive columns within a custom post template. This structure allows for flexible layouts that adapt to various screen sizes.
| Screen Size | HTML Structure | Description |
|---|---|---|
| Desktop (≥ 992px) |
…
…
|
Two distinct columns are displayed side-by-side. |
| Tablet (768px – 991px) |
…
…
|
Two columns, but potentially stacked vertically. Media queries handle the adjustment. |
| Mobile (≤ 767px) |
…
…
|
Both columns stack vertically to optimize space for smaller screens. |
Error Handling and Debugging
Building custom post templates in WordPress can sometimes lead to unexpected behavior. Thorough error handling and debugging strategies are crucial to identifying and resolving issues efficiently. Properly implemented error handling makes your custom templates more robust and user-friendly, ensuring a smooth user experience.Effective debugging allows you to pinpoint the source of problems, whether they stem from coding errors, conflicts with other plugins, or unforeseen interactions with WordPress core functions.
This proactive approach significantly reduces the time spent troubleshooting and enhances the overall development process.
Troubleshooting Template Issues
A systematic approach to troubleshooting is essential. Begin by carefully reviewing your code for syntax errors and logical inconsistencies. Verify that all function calls are correct and that variables are being used appropriately. Pay close attention to potential conflicts between your custom code and existing WordPress functions or plugins.
Common Errors and Solutions
Several common errors can disrupt your custom templates. Incorrect function calls, missing or incorrect parameters, and problems with variable scoping are frequent issues. Understanding these errors and their solutions empowers you to effectively address them.
- Incorrect Function Calls: Ensure that you’re using the correct function names and parameters. Double-check documentation for precise syntax and expected arguments. For example, if you’re using a custom function to display data, confirm that the function is properly defined and that the arguments you’re passing are correct.
- Missing or Incorrect Parameters: Parameters are essential to functions. If a function requires specific parameters, ensure they are provided correctly. Verify the data types of the parameters, and if necessary, perform type checking to avoid unexpected errors.
- Variable Scope Issues: Variables defined within a specific scope might not be accessible in other parts of your code. Incorrect variable scoping can lead to unexpected results or errors. Carefully manage variable scope and ensure variables are accessible where needed.
Using WordPress Debugging Tools
WordPress offers built-in debugging tools that can aid in identifying problems. The debugging tools can help you understand the flow of execution and pinpoint the location of errors.
- WordPress Debug Mode: Activating WordPress debug mode reveals detailed error messages, making it easier to identify the source of the problem. This feature provides critical information to pinpoint the root cause of unexpected behavior.
- Error Logs: Examining error logs can reveal valuable information about problems. These logs often contain details about the error, including the file name and line number where the issue occurred. Reviewing the error logs will help in tracing the cause of the problem.
Logging Errors and Debugging Custom Post Template Code
Logging errors is essential for tracking down issues in your custom code. This allows you to understand what happened and why a particular error occurred. Logging errors can be done using the WordPress error logging system or custom logging functions.
- Error Logging System: WordPress provides a robust error logging system that allows you to record errors and exceptions. Using this system can enhance your understanding of the specific cause of the error.
- Custom Logging Functions: For more comprehensive control over logging, create custom functions to log specific messages or data. These functions can be designed to log messages to files or to a database, providing flexibility in how you record error information.
Troubleshooting Guide for Custom Template Issues
A structured troubleshooting guide helps streamline the process of identifying and resolving custom template issues.
| Issue | Possible Causes | Solutions |
|---|---|---|
| Template not loading correctly | Incorrect template file path, syntax errors, conflicts with other plugins | Verify file paths, check for syntax errors, deactivate conflicting plugins |
| Custom function not working as expected | Incorrect function parameters, missing variables, logical errors | Review function calls and parameters, check for missing variables, debug code logic |
| Displaying incorrect data | Incorrect data retrieval, improper variable use, database query errors | Verify data retrieval methods, check variable usage, examine database queries |
Security Best Practices
Custom post templates, while offering flexibility, introduce potential security vulnerabilities if not implemented correctly. Robust security measures are crucial to protect your WordPress site and user data. This section details essential security best practices to incorporate when creating custom templates. Failing to address security proactively can expose your site to various attacks, compromising user trust and potentially leading to data breaches.Implementing secure coding practices is vital when working with custom post templates.
This involves understanding and mitigating potential risks by proactively addressing vulnerabilities and adhering to security best practices. This proactive approach minimizes the likelihood of attacks and safeguards user data.
Sanitizing User Input
User-supplied data, such as comments, forms, or custom fields, is a primary source of potential security threats. Unsanitized input can lead to code injection attacks, cross-site scripting (XSS), or other malicious activities. Thorough sanitization of all user inputs is paramount.
- Use WordPress’s built-in sanitization functions. Functions like
esc_attr(),esc_html(), andesc_url()are crucial for escaping special characters and preventing script injection. - Validate user input rigorously. Implement checks to ensure data conforms to expected formats and ranges. For example, restrict input length or data types to prevent malicious input that might bypass sanitization.
- Limit user input to specific character sets. Restrict input to approved characters and reject any unexpected ones. This helps prevent the use of special characters that could be used in malicious attacks.
- Never directly embed user input into database queries or dynamic HTML content without proper sanitization. This practice is a common source of vulnerabilities.
Preventing Code Injection Attacks
Code injection attacks occur when malicious code is inserted into your application. This can happen when user input is not properly sanitized and then used in dynamic content generation. To prevent this, always sanitize and validate user input.
- Use parameterized queries for database interactions. This approach isolates user input from the query structure, effectively preventing malicious code from being interpreted as SQL commands. For example, use prepared statements.
- Validate user input against expected formats. Do not trust user input. Validate it against expected formats and reject any unexpected or suspicious data. Use regular expressions or custom validation functions to ensure input conforms to predefined rules.
- Limit user input length. Malicious scripts can be hidden in extremely long strings. Limiting input length can prevent attackers from including overly long payloads.
Security Checklist for Custom Post Templates
A structured checklist helps ensure that security considerations are addressed during development.
- Sanitize all user input before using it in any part of the template, including database queries and dynamic HTML generation.
- Validate all user input according to expected formats and ranges.
- Use prepared statements or parameterized queries for all database interactions.
- Avoid using eval() or similar functions that execute arbitrary code.
- Regularly update WordPress core, plugins, and themes to patch security vulnerabilities.
- Use strong passwords for all WordPress accounts.
- Enable security plugins to enhance site security and provide protection against various attacks.
Using WordPress Hooks and Filters Securely
WordPress hooks and filters provide a powerful mechanism for extending functionality. However, improper use can introduce vulnerabilities.
- Validate and sanitize data passed through hooks and filters to prevent malicious code from being introduced into your custom template.
- Avoid using user input directly in hooks and filters without proper sanitization.
- Only modify or add content to the intended locations. Avoid modifying parts of the site that you don’t control to prevent unintended consequences or vulnerabilities.
Ultimate Conclusion
By mastering custom post templates, you gain control over the presentation of your content. This allows for a more tailored user experience, increased site engagement, and ultimately, a more professional and visually appealing website. This comprehensive guide equips you with the knowledge to create exceptional custom post templates that elevate your WordPress site.