How to add image icons with navigation menus in WordPress? This guide dives deep into the world of visual navigation, transforming plain text menus into engaging, visually rich experiences. We’ll explore various methods, from user-friendly plugins to meticulous manual coding, and equip you with the skills to craft beautiful and functional menus that resonate with your site’s aesthetic. We’ll cover accessibility considerations and responsive design, ensuring your menus are not only visually appealing but also usable on all devices.
Imagine a website where your menu options aren’t just words, but are also instantly recognizable icons, each one a miniature masterpiece. This guide will help you to design such a site, taking you through different options and considerations. From the fundamentals of adding images to menus to mastering responsive design, we’ll cover it all.
Introduction to WordPress Image Icons and Navigation Menus
Adding image icons to your WordPress navigation menus can significantly enhance the visual appeal and usability of your website. Icons can convey meaning quickly and effectively, improving the overall user experience. This approach often leads to a more polished and professional appearance, especially for websites with a strong visual identity.Using image icons in menus is a powerful tool for creating a more intuitive and engaging user interface.
By incorporating visual cues, you can improve the clarity and accessibility of your site’s navigation, guiding visitors smoothly through the different sections of your website.
Common Use Cases and Benefits
Image icons in navigation menus are incredibly versatile. They’re frequently used to represent frequently accessed areas like blogs, contact forms, or social media accounts. This visual representation simplifies navigation and improves the user experience. Beyond the visual aspect, using icons often results in a more professional and streamlined design, especially when they are integrated cohesively into the website’s overall aesthetic.
Adding image icons to WordPress navigation menus is pretty straightforward. However, for truly engaging product pages, you need to consider SEO best practices, like the ones discussed in how to create seo powered product pages. Once you’ve optimized your product descriptions and images, remember to tailor your menu icons to match the overall visual theme for a cohesive and user-friendly experience.
Methods for Adding Images to Menus
Several methods exist for adding image icons to WordPress navigation menus. One common approach involves using the built-in WordPress menu editor. This method allows you to select an image file from your computer and upload it directly into the menu. Another popular method utilizes a plugin, which often provides a more comprehensive range of customization options. Some plugins offer advanced icon libraries or support for specific icon formats, streamlining the process of integrating them into your menus.
Adding image icons to WordPress navigation menus is a straightforward process. You can easily customize your site’s look by choosing appropriate images for each menu item. However, if you’re looking for fun video platforms, there are many excellent alternatives to explore. For example, checking out alternatives for users if tiktok banned can help you discover other video-sharing options.
Regardless of your choice, learning how to style your WordPress menus with custom images can greatly improve your site’s visual appeal and user experience.
Accessibility Considerations
It’s crucial to prioritize accessibility when incorporating image icons into navigation menus. Always ensure that the visual cues provided by the icons are also conveyed through alternative text descriptions (alt text). This crucial step allows users with visual impairments who are using screen readers to understand the purpose of each menu item. This ensures that all users, regardless of their abilities, can easily navigate and understand your website’s structure.
This approach not only improves accessibility but also enhances by providing more context for search engines. A good example of this practice would be using alt text like “blog” or “contact” when including an icon representing these functions in the navigation menu.
Methods for Adding Image Icons to Menus
Adding visual cues to navigation menus enhances user experience. Icons, often small images, provide a quick way to identify menu items. This is particularly useful for websites with complex structures, making it easier for users to quickly locate the information they need.Employing image icons effectively within navigation menus significantly improves usability and aesthetics. Different methods exist for incorporating these visual aids, each with its own set of advantages and disadvantages.
Choosing the right method depends on your technical skills and the complexity of your website’s design.
Plugin-Based Methods for Adding Image Icons
Several WordPress plugins streamline the process of integrating image icons into menus. These plugins often provide user-friendly interfaces to manage icons and their corresponding menu items. They typically offer various icon libraries or allow for uploading custom icons. This approach is suitable for users who prioritize ease of use over complete control.
- Many plugins offer a drag-and-drop interface for associating icons with menu items. This simplifies the process for users with limited technical expertise.
- These plugins often provide extensive customization options, allowing for variations in icon size, spacing, and alignment.
- Using plugins eliminates the need for manual HTML and CSS coding, saving time and effort.
- Plugins may have limitations regarding the customization of icon styling, potentially hindering advanced design requirements.
Manual Methods for Adding Image Icons Using CSS and HTML
A more advanced approach involves embedding icons using CSS and HTML. This method offers greater control over the visual presentation of icons and their integration within the menu structure. This method is ideal for users who have a strong understanding of web development.
- Using CSS allows for precise control over the positioning and styling of icons, allowing for better alignment and integration with your website’s design.
- The use of HTML ensures icons are incorporated seamlessly into the navigation structure, following the website’s markup structure.
- This approach grants greater control over icon size, spacing, and positioning within the menu.
- This method requires a working knowledge of HTML and CSS, which might be a significant barrier for those without a strong web development background.
Comparison of Plugin and Manual Methods
| Feature | Plugin Method | Manual Method |
|---|---|---|
| Ease of Use | High | Low |
| Customization Options | Limited | High |
| Technical Skills Required | Low | High |
| Development Time | Faster | Slower |
| Cost | May involve plugin costs | Free (if using existing resources) |
Image File Formats, Sizing, and Optimization
Selecting appropriate image formats is crucial for optimal performance. Web-optimized formats like PNG (for images with transparency) or SVG (for scalable vector graphics) are generally preferred over larger file formats. Using appropriate image formats ensures optimal display speed and minimizes the loading time of your website.
- PNG files support transparency, making them suitable for icons with transparent backgrounds.
- SVG files offer scalability, meaning they can be resized without losing quality.
- JPEG files are generally preferred for photographs and images with complex details.
Proper sizing is essential for optimal visual display. Images should be sized to fit within the navigation menu’s layout without distorting their appearance. Using appropriate sizes and formats helps to avoid visual clutter and ensure a seamless user experience.Image optimization techniques like compression can reduce file sizes without significantly impacting visual quality. This optimization improves the loading speed of your website and enhances the overall user experience.
This approach will improve website performance and user experience.
Plugin Integration for Icon Implementation
Plugins offer a streamlined approach to adding image icons to WordPress menus. They often provide user-friendly interfaces and pre-built functionalities, making the process significantly easier compared to manual code adjustments. This section will explore popular plugins, their installation, customization options, and icon library integration.Integrating plugins allows for more control over the visual presentation of navigation menus, enabling users to personalize the website’s appearance.
The ability to manage icon sizes and styles directly within the plugin interface eliminates the need for intricate code manipulation.
Popular Plugins for Image Icons
Several plugins facilitate the integration of image icons into WordPress menus. Some popular choices include WP Menu Icons, Menu Icons Pro, and Icon Menu. Each plugin boasts unique features and capabilities, catering to different design needs. Choosing the right plugin depends on the specific requirements and desired level of customization.
Installation and Activation
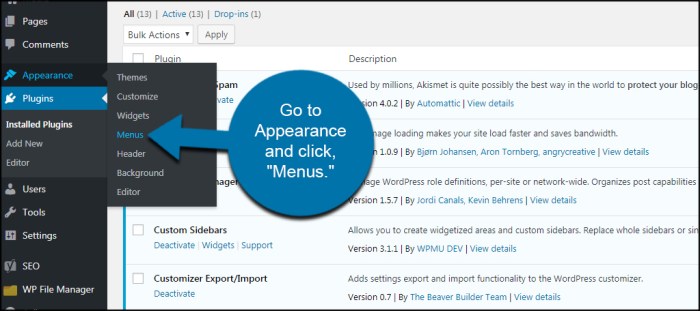
Installing and activating these plugins is typically straightforward. Most WordPress plugin repositories offer step-by-step instructions. Generally, users navigate to the Plugins section in the WordPress dashboard, search for the desired plugin, click “Install Now,” and then “Activate.” Post-activation, the plugin’s interface becomes accessible through the WordPress admin panel.
Customization Options
Plugins typically provide various customization options. These might include choosing icon sizes, colors, and styles. Users can often select icons from built-in libraries or upload custom images. Some plugins allow for the creation of custom stylesheets for enhanced visual control.
Integrating Icons from External Libraries
Plugins often support the integration of icons from external icon libraries like Font Awesome or Ionicons. This feature enables users to access a vast selection of vector icons without the need to upload individual image files. The integration process usually involves selecting the desired icon library within the plugin settings.
Managing Icon Sizes and Styles
Plugins offer tools for managing icon sizes and styles. This usually involves adjustable settings within the plugin’s interface. For example, users might be able to set specific dimensions or adjust colors and opacity. Furthermore, the ability to change the icon’s size and style is often integrated with menu item customization, allowing users to maintain visual consistency throughout the website.
Example Plugin Features (Illustrative)
- WP Menu Icons: Offers a wide array of icons, allows users to upload custom icons, and provides size customization options.
- Menu Icons Pro: Features advanced styling options, enabling users to create unique menu designs. It also integrates with popular icon libraries, allowing users to add icons from these libraries to their menus.
- Icon Menu: Provides a clean and intuitive interface for managing icons within menus. It supports custom icon uploads and allows for precise control over icon sizes and styles.
Manual Icon Implementation with HTML and CSS

Adding image icons to your WordPress navigation menus manually allows for precise control over styling and responsiveness. This method gives you flexibility to customize the look and feel of your menu, especially if you need a unique design. This approach is useful when you need intricate styling, complex positioning, or unique visual representations for menu items.By implementing icons with HTML and CSS, you maintain complete control over how they interact with the rest of your website’s design.
This method gives you the power to adjust the icons’ appearance and behavior based on the device used to view the website.
HTML Structure for Linking Images to Menu Items
The core HTML structure involves embedding the image icon within the menu link. This ensures the icon visually represents the link’s function. The image acts as a clickable element, directing users to the intended page.
Template for Incorporating Image Icons within the Navigation Menu
A standard WordPress navigation menu is typically built with ` ` tags for links. You simply nest the image icon within this `` tag, positioning it appropriately. This approach is straightforward and easily integrated with existing menu structures.
Adding image icons to your WordPress navigation menus is a straightforward process. You can easily customize your website’s look and feel. While exploring this, you might also be interested in learning about Salesforce cookies for CRM, which can impact how your website interacts with user data. Salesforce cookies for CRM can be crucial for understanding user behavior within your CRM system.
Ultimately, knowing how to use these image icons effectively can enhance your website’s user experience.
CSS for Styling and Positioning Image Icons
CSS is used to style the icon’s appearance and position it precisely within the menu item. This includes setting the icon’s size, color, and alignment relative to the text label. For instance, you can position the icon to the left or right of the menu item’s text, adjusting its spacing.
- Use CSS selectors to target specific menu items for customized styling.
- Apply appropriate padding and margins to achieve desired spacing between the icon and text.
- Employ `display: inline-block` to enable the icon to function as an inline element while maintaining its block-level properties.
Responsive Design for Different Screen Sizes
For a consistent user experience across various devices, responsive design is crucial. This involves adjusting the icon’s size and positioning based on the screen width. Using media queries in CSS allows you to target specific screen sizes, enabling customized styling.
- Employ media queries to modify the icon’s size and position based on screen width.
- For smaller screens, potentially reduce the icon size to maintain readability and avoid visual clutter.
- Use `em` or `rem` units for sizing to maintain proportions relative to the font size, ensuring scalability.
Sample HTML Code Snippet
“`html ![]() Page 1“`
Page 1“`
Sample CSS Code Snippet
“`CSS.menu-item a display: inline-block; padding: 10px;.menu-item img width: 20px; height: 20px; margin-right: 5px; /* Adjust spacing as needed – /@media (max-width: 768px) .menu-item img width: 15px; height: 15px; “`
Responsive Design Considerations for Image Icons
Responsive design is crucial for a positive user experience across various devices. Image icons in navigation menus, while visually appealing, need to adapt seamlessly to different screen sizes. Failing to account for responsiveness can lead to icons appearing too small, too large, or distorted, ultimately hindering usability. This section will detail how to make your icon menus truly responsive.Responsive design ensures that your website’s layout and content adapt to the user’s device, be it a phone, tablet, or desktop computer.
This is particularly important for image icons within navigation menus, as they must maintain clarity and usability across all screen sizes. The right approach involves strategic adjustments to icon sizes and the intelligent use of CSS media queries.
Adjusting Icon Sizes Based on Screen Size
Properly sizing icons for different screen sizes is key to maintaining visual appeal and readability. Icons that are too small on a mobile device become difficult to tap, while oversized icons on a desktop might look cluttered. Dynamic resizing, achieved through CSS media queries, allows for the optimal presentation of icons across all devices. This ensures that the user experience remains consistent and intuitive.
Using CSS Media Queries for Responsive Icon Display
CSS media queries are essential tools for tailoring the presentation of your icons to various screen sizes. They allow you to define specific styles for different screen resolutions and orientations. By employing media queries, you can ensure that icons scale proportionally to the screen, maintaining a clear and consistent appearance. The table below demonstrates how different media queries impact icon sizes.
| Screen Size | Icon Size | CSS Media Query |
|---|---|---|
| Mobile | Small | @media (max-width: 768px) … |
| Tablet | Medium | @media (min-width: 769px) and (max-width: 992px) … |
| Desktop | Large | @media (min-width: 993px) … |
Example Media Query for Adjusting Icon Sizes
The following example demonstrates how to adjust icon sizes using a media query. This snippet assumes your icons are within an unordered list (`
- `) element. This example targets icons within a navigation menu and adjusts the font size accordingly.
“`CSS
/* Default icon size (desktop)
-/
ul.navigation li a span.icon
font-size: 20px;
/* Adjust icon size for smaller screens
-/
@media (max-width: 768px)
ul.navigation li a span.icon
font-size: 16px;
/* Adjust icon size for larger screens (tablet)
-/
@media (min-width: 769px) and (max-width: 992px)
ul.navigation li a span.icon
font-size: 18px;
“`
This example snippet adjusts the font size of icons within a navigation menu based on the screen size. Adjust the `font-size` values to match your desired icon sizes. Note the importance of using `span.icon` to target the specific icon element. Remember to adapt the example to your specific HTML structure and styling.
Accessibility and Best Practices
Adding image icons to WordPress navigation menus can significantly enhance user experience, but it’s crucial to prioritize accessibility for all users, including those with disabilities. Failing to consider accessibility can exclude a substantial portion of your website’s potential audience. This section focuses on the importance of alt text, semantic HTML, and best practices for creating accessible image icons.
Importance of Accessibility
Ensuring website accessibility is a legal and ethical imperative. It’s not just about complying with regulations, but about creating a website that’s usable by everyone, regardless of their abilities or disabilities. Users with visual impairments, cognitive differences, or motor limitations rely on assistive technologies like screen readers to navigate the web. These technologies need accurate and descriptive information to convey the meaning of elements.
Alt Text for Screen Readers, How to add image icons with navigation menus in wordpress
Alt text (alternative text) is a critical attribute for image icons in navigation menus. It provides a textual description of the image that screen readers can use to convey the icon’s meaning to users who cannot see it. The alt attribute should clearly communicate the purpose and function of the icon. Vague or generic descriptions are not helpful to screen readers or users.
Alternative Text Descriptions
When writing alt text for image icons, focus on concise and accurate descriptions. Avoid overly descriptive language. For example, instead of “a small, blue, graphic of a home,” try “home icon” or “home page.” If the icon represents a specific action, such as “login,” the alt text should reflect this action, such as “login button.” Consider the context of the icon within the navigation menu; this will help you craft the most appropriate and useful alt text.
Semantic HTML
Semantic HTML tags play a significant role in accessibility. Using the appropriate HTML tags, such as ` ` for links and `` or `` as needed, can improve the overall structure and readability of the code. This structure helps screen readers interpret the page’s content correctly, making it easier for users to navigate and understand the content. Use appropriate semantic tags for your icons to enhance readability and maintain the structure of your page.
Examples of Proper Alt Text Attributes
| Icon | Alt Text | Description |
|—————-|——————————————-|————————————————————————————————————————————————————————————————————————————|
| Home Icon | home, home page, go to homepage | Provides clear indication of the function and purpose of the icon.
|
| Search Icon | search, search website, find results | Describes the icon’s purpose.
|
| User Icon | user profile, user account | Provides a clear indication of the icon’s purpose and the action it represents.
|
| Logout Icon | logout, exit, sign out | Describes the icon’s purpose and the action it represents.
|
| Shopping Cart Icon | shopping cart, view cart, add to cart | Provides a clear description of the icon’s purpose, the action it represents, and its functionality.
|
These examples illustrate how concise, descriptive, and accurate alt text can significantly enhance the accessibility of image icons in navigation menus. The key is to focus on conveying the meaning of the icon, not just its visual representation.
Troubleshooting Common Issues

Adding image icons to WordPress navigation menus can sometimes present challenges. This section details common problems users encounter, along with practical solutions to resolve them efficiently. Understanding these troubleshooting steps ensures a smooth and visually appealing user experience on your website.
Troubleshooting involves identifying the source of the issue, whether it’s a plugin conflict, incorrect image dimensions, or an alignment problem. Effective problem-solving requires methodical investigation and application of appropriate fixes.
Image Display Problems
Common issues include icons not appearing at all, displaying incorrectly, or not matching the intended size or style. These problems often stem from incorrect image paths or formatting. Double-check the file paths in your WordPress menu settings to ensure they are accurate and point to the correct image location. Ensure that the image format is compatible with the WordPress environment (e.g., JPEG, PNG, GIF).
Incorrectly sized images can lead to distorted or misaligned icons. Use appropriate image dimensions that align with your website’s design and avoid oversized icons.
Alignment Issues
Icons might not align correctly within the navigation menu, disrupting the overall visual appeal. This can be due to improper CSS styling or conflicting plugins. Verify that the CSS code applied to the menu elements isn’t causing the alignment problems. Check if any conflicting plugins are interfering with the styling or layout of your navigation. Use a browser’s developer tools to inspect the affected element’s styles and pinpoint any discrepancies.
Adjust CSS rules to correctly position the icons and align them with the menu items.
Plugin Conflicts
Plugins, while beneficial, can sometimes interfere with the proper functioning of the navigation menus and icon display. Conflicts can lead to unexpected errors or missing icons. Disable plugins one by one to identify the culprit. If a particular plugin is causing the problem, consider contacting the plugin developer for support or finding an alternative solution. Carefully review the plugin documentation for potential compatibility issues with your theme or other plugins.
Image Loading Problems
Image loading issues can stem from various factors, such as slow server speeds, large image files, or incorrect image paths. Check your website’s server performance and ensure it can handle the requests for images. Optimize images for web use to reduce file sizes without compromising quality. If the issue persists, review the image paths in your WordPress menu settings and ensure they are correct.
Consider using a caching plugin to improve image loading times. If you are still having trouble, contact your hosting provider to check for any server-side issues that might be impacting image loading.
Troubleshooting Example: Icon Not Displaying
If an icon isn’t appearing, first verify the image file exists in the specified location and that the file path in the WordPress menu settings is accurate. Check the image file format to ensure it’s compatible with WordPress. If the file path is correct and the format is compatible, consider clearing your browser’s cache and trying again. If the issue persists, try temporarily disabling any plugins that might be interfering with the icon display.
Test with a different browser if necessary to rule out browser-specific issues.
Wrap-Up: How To Add Image Icons With Navigation Menus In WordPress
In conclusion, enhancing your WordPress navigation menus with image icons can elevate your website’s visual appeal and user experience. Whether you opt for the ease of plugins or the precision of manual coding, this guide provides a comprehensive roadmap to achieving stunning results. Remember to prioritize accessibility and responsive design for a truly user-friendly navigation experience. Now go forth and create beautiful, functional, and accessible menus!