Blog post image guide: Unlock the power of visual storytelling! This guide dives deep into crafting compelling blog posts by mastering image selection, editing, and integration. We’ll explore strategies for choosing the perfect visuals, enhancing their quality, and strategically positioning them to maximize engagement and readability.
From selecting royalty-free images to optimizing file sizes and adding captivating captions, this comprehensive guide empowers you to elevate your blog posts beyond the ordinary. Learn how to create a cohesive visual theme, enhance accessibility with alt text, and optimize for different devices. This post will walk you through the entire process, step-by-step.
Image Selection Strategies
Choosing the right images for your blog posts is crucial for engagement and readability. High-quality visuals can significantly enhance understanding and impact the overall user experience. Beyond just aesthetics, well-chosen images contribute to a more accessible and shareable piece. This guide will delve into the art of image selection, from sourcing to optimization.Effective image selection goes beyond simply finding a pretty picture.
It requires a strategic approach that considers the content, audience, and overall message of your blog post. This means prioritizing images that are not only visually appealing but also relevant, accessible, and optimized for your platform.
Image Relevance and Visual Appeal
Visuals should be directly related to the content of your blog post. A picture of a vibrant sunset won’t resonate with a post discussing data analysis. Consider the message you’re trying to convey and choose images that reinforce that message. Visual appeal is essential; a captivating image draws the reader in and keeps them engaged. Think about color palettes, composition, and overall aesthetic.
High-quality images with clear details and vibrant colors are more likely to capture attention. For example, a close-up image of a product’s intricate design can convey a sense of quality and craftsmanship, while a broader landscape shot can evoke a feeling of tranquility or vastness.
Finding High-Quality, Royalty-Free Images
Numerous resources offer high-quality, royalty-free images for blog posts. Websites like Unsplash, Pexels, and Pixabay provide a vast library of free images, often with creative commons licenses allowing for commercial use. Be sure to review the specific license terms for each image to ensure compliance. When searching, use precise s to find images that align perfectly with your topic.
For instance, searching for “vintage typewriter” will yield more relevant results than simply searching for “typewriter.” Thoroughly scrutinize the image’s resolution and file format to ensure it’s suitable for your blog’s needs.
Evaluating Image Suitability
A crucial step in image selection is evaluating its suitability for the specific blog post. Consider the blog post’s tone and target audience. A humorous blog post might benefit from a playful or quirky image, while a serious piece requires a professional and trustworthy visual. A good rule of thumb is to align the image with the overall message and mood of the post.
For example, a post about the benefits of outdoor exercise would be best paired with an image of people enjoying nature.
Image Sources and Licensing
Different image sources have different licensing terms. Understanding these terms is crucial to avoid copyright infringement. Sites like Unsplash often offer images under creative commons licenses, which typically permit commercial use with attribution. Other sources may require payment or have more restrictive terms. Always carefully review the license associated with the image before using it.
Checking the license terms of the image source is essential. For instance, an image from a website that doesn’t specify its licensing terms might lead to issues with copyright.
Image Optimization
Image optimization is critical for blog post performance. Large image files can slow down loading times, negatively impacting user experience. Optimizing images for size and format can significantly improve loading speed. Compress images without sacrificing quality. Use appropriate file formats like JPEG or WebP for optimal results.
For example, a JPEG image with a file size of 500KB will load much faster than a 5MB PNG. Choose the image format that best balances file size and quality for your specific needs. For example, JPEG is a good choice for photographs, while PNG is often better for graphics or images with transparent backgrounds.
So, you’re tackling a blog post image guide? Great! Choosing the right visuals is key, and understanding how images perform on social media platforms like Instagram or TikTok is crucial. Knowing how to use high-quality images and videos effectively is critical for engaging your audience. Referencing a guide on social media photos videos can be incredibly helpful in this aspect.
Ultimately, a well-crafted image guide is essential for a successful blog post.
Image Editing and Enhancement
Image editing is crucial for preparing visually appealing and high-quality images for blog posts. Effective image editing goes beyond simply cropping or resizing; it involves enhancing visual appeal, optimizing file sizes, and ensuring the images align seamlessly with the overall blog aesthetic. This section will explore techniques for enhancing image quality, preparing images for online use, and improving clarity and visual appeal using image editing tools.Image enhancement techniques like cropping, resizing, and color correction are essential for optimizing images for online use.
Careful application of these techniques can significantly improve the overall impact of your blog post images. By understanding the nuances of image editing, you can elevate your blog’s visual presence and engage your audience more effectively.
Image Quality Enhancement Techniques
Image quality enhancement techniques involve several crucial steps that collectively improve the visual appeal and clarity of your images. These techniques include cropping, resizing, and color correction.
- Cropping: Cropping involves removing unwanted portions of an image, focusing attention on the subject. It’s a straightforward technique to improve composition and eliminate distractions. A well-cropped image can significantly enhance the visual impact by focusing the viewer’s eye on the essential elements. For example, cropping a landscape photo to remove unnecessary sky or foreground elements can draw attention to the central point of interest.
Careful cropping can help to frame the subject more effectively and create a more balanced and aesthetically pleasing image.
- Resizing: Resizing images is vital for optimizing their file size for online use. Larger file sizes can slow down loading times, impacting user experience. The optimal size will depend on the specific platform and the image’s intended use within the blog post. Using tools to resize images proportionally while maintaining the image’s original aspect ratio is crucial to prevent distortion.
- Color Correction: Color correction is essential for ensuring images have a consistent and appealing color palette. Tools allow adjustment of hue, saturation, and brightness to create a cohesive visual theme within your blog. For instance, adjusting the color balance in a photograph can make it appear more vibrant and engaging, or reduce harshness. Proper color correction improves the overall visual appeal and readability of the blog post.
Preparing Images for Online Use
Effective image preparation involves optimizing file sizes and choosing appropriate formats. This ensures images load quickly without compromising quality.
- File Size Optimization: Reducing file size without significant quality loss is a crucial aspect of image preparation. Compressing images using appropriate software or online tools can significantly reduce the file size without noticeably affecting the visual quality. Using compression algorithms tailored to the specific format can achieve optimal results. Tools often provide options for different compression levels, allowing users to balance file size and quality.
- Format Considerations: The image format significantly affects file size and quality. Formats like JPEG are well-suited for photographs, offering a good balance between file size and image quality. Formats like PNG are ideal for graphics and images with sharp lines or transparency, as they generally maintain higher quality. Choosing the correct format based on the image’s content is crucial.
Using Image Editing Tools
Image editing tools provide versatile options for enhancing images. These tools allow users to manipulate images to improve clarity and visual appeal.
- Example: Software like Photoshop, GIMP, or online tools offer features like sharpening, noise reduction, and color adjustments to enhance image quality. By using these tools effectively, you can achieve professional-level results without needing extensive technical expertise.
Adding Text Overlays to Images
Adding text overlays to images can enhance engagement and readability. Clear and concise text enhances the image’s impact.
- Step-by-Step Guide:
- Open the image in your chosen editing software.
- Add a new layer for the text overlay.
- Select the text tool and type the desired text.
- Adjust font, size, color, and placement as needed.
- Ensure the text is legible and complements the image.
- Save the edited image.
Image Resolution and Display Quality
Image resolution directly impacts display quality. Higher resolution images generally provide sharper and more detailed visuals. Consider the intended display size and resolution when selecting images.
- Importance: High-resolution images are essential for maintaining clarity and detail, especially when displayed on larger screens or in high-resolution printouts. Low-resolution images can appear pixelated or blurry, negatively impacting the overall visual appeal.
Image Organization and Presentation
A well-organized and visually appealing image presentation is crucial for enhancing readability and engagement in a blog post. Images should seamlessly integrate with the text, guiding the reader through the content and reinforcing the message. This section will delve into best practices for image placement, alignment, formatting, and overall visual cohesion.Effective image presentation isn’t just about aesthetics; it significantly impacts the user experience.
Clear and strategic placement of images ensures the reader’s focus remains on the intended content flow, fostering a more enjoyable and informative reading experience. Well-chosen images can significantly boost comprehension and memorability of the material.
Image Placement and Alignment Strategies
Strategic placement of images is key to maximizing readability. Images should be placed near the related text, ideally within the paragraph or immediately following it. This proximity creates a clear connection between the visual and the written content, improving understanding and engagement. Avoid placing images too far from the relevant text, as this can disrupt the flow and make the content less accessible.
Consider using descriptive captions to further enhance the image’s impact.
Image Format Selection
Different image formats cater to different needs. JPEG (JPG) is ideal for photographs and images with complex details and smooth color gradients. PNG is best for graphics, logos, and images with sharp lines or text, as it often maintains high resolution and transparency. GIFs are suitable for animations or simple, looping images. Choosing the appropriate format ensures optimal image quality and file size, preventing unnecessary loading times and impacting user experience.
For example, a photograph of a product should be in JPEG to convey its realistic appearance, whereas a logo should be in PNG to maintain sharp edges and high resolution.
Image Arrangement and Flow
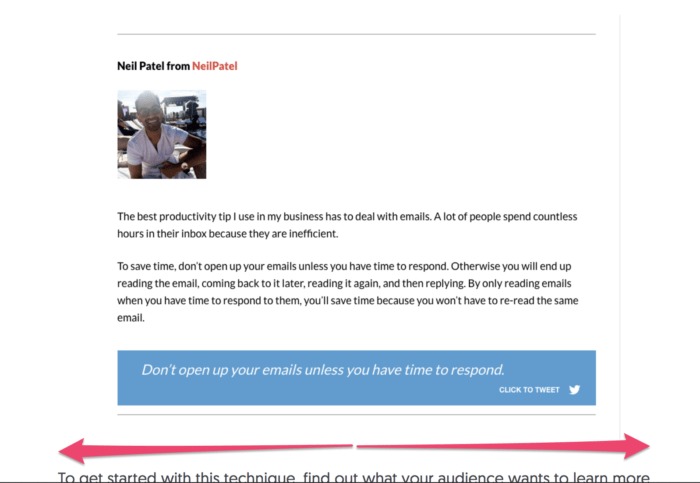
Images should be strategically arranged to guide the reader through the content. Consider using a consistent visual flow to build on the information presented. For example, a sequence of images can present a step-by-step process, while a series of images depicting different perspectives of an object can allow for deeper understanding. Visual cues, like arrows or numbering, can further enhance the arrangement, aiding comprehension.
Images should be presented in a logical order that complements the flow of the text.
Visual Cohesion and Theme, Blog post image guide
Maintaining a consistent visual theme across the entire blog post is vital for creating a cohesive and professional look. This involves using a similar color palette, font styles, and image styles throughout. A visually consistent blog post is more aesthetically pleasing and creates a stronger impression on the reader. For example, using a specific color scheme for images and text will create a unified aesthetic.
A blog post about travel might use a color scheme that evokes feelings of adventure and exploration, while a post about finance might use a color scheme that projects trust and security. A consistent use of imagery, fonts, and color palettes is essential for establishing a professional and engaging visual identity.
Image Captions and Alt Text
Adding descriptive captions and alt text to your images is crucial for enhancing user experience and improving . High-quality images, while visually appealing, are often inaccessible to those using assistive technologies like screen readers. Captions and alt text bridge this gap, making your content more inclusive and understandable for a broader audience. This section provides a comprehensive guide to crafting effective image descriptions.Effective image descriptions enhance engagement and understanding by providing context and details.
They can be short and sweet or more elaborate, depending on the image’s complexity and the overall message. The goal is to complement the visual element with supplementary information that enriches the user experience.
Role of Image Captions
Image captions play a vital role in enhancing understanding and engagement by providing context and additional information about the image. They act as a bridge between the visual and the written content, allowing readers to grasp the significance of the image within the larger narrative. Well-written captions can improve comprehension, especially for complex images, making the content more accessible and engaging for a wider audience.
So, I’m diving deep into blog post image guides, and a crucial element for optimizing these visual assets is understanding audience engagement. Knowing which images perform best requires a close look at Google Analytics reports, like those found in google analytics reports to improve marketing. By analyzing these reports, we can see which images are driving clicks and boosting overall engagement.
This data-driven approach will help refine my image choices for future blog posts, making them even more effective in grabbing attention.
Writing Effective Alt Text
Alt text (alternative text) is crucial for accessibility and . It’s a short, descriptive text that describes the image to users who can’t see it, such as those using screen readers. This is particularly important for users with visual impairments. Moreover, search engines use alt text to understand the content of the image, improving the image’s visibility in search results.
This means that using relevant s in alt text can boost your image’s ranking in search engine results pages (SERPs).
Alt Text for Screen Readers
Alt text provides a textual description of the image for screen readers. A good alt text description is concise, accurate, and clearly conveys the image’s content. Avoid vague descriptions or redundant phrases. For instance, instead of “a picture of a cat,” try “a ginger cat sitting on a windowsill.” This detail-oriented approach helps screen reader users comprehend the image’s context.

Image Captions for Search Engines
Image captions, while primarily for human readers, also contribute to image optimization for search engines. Search engines crawl and index image captions, using the text to understand the image’s content. Using relevant s in captions can help search engines identify the image’s subject matter and improve its visibility in image search results. This practice is part of a broader strategy for images.
Templates for Engaging Image Captions
Here are some templates for creating engaging image captions:
- Descriptive Captions: Focus on details and provide context about the image. For example, “A vibrant sunset over the Pacific Ocean, painting the sky in hues of orange and pink.” This caption gives the reader a clear idea of what the image depicts.
- Question-Based Captions: Encourage interaction by posing a question related to the image. For example, “What’s your favorite way to spend a summer evening?” This style prompts engagement and discussion.
- Call-to-Action Captions: Direct readers to a specific action, like visiting a website or social media page. For example, “Learn more about our latest product launch! Visit [website address].” This caption provides a clear call to action.
Using these templates, you can craft image captions that are both informative and engaging. These examples demonstrate the power of effective image descriptions.
Image Integration into Blog Post Structure

Images are not just decorative elements in a blog post; they significantly enhance reader engagement and comprehension. Well-integrated visuals can break up large blocks of text, improve readability, and help readers retain key information. This section will delve into strategic image placement, visual breaks, and leveraging images to highlight crucial takeaways.Effective image integration transforms a blog post from a wall of text to an engaging, easily digestible experience.
Readers are more likely to stay interested and absorb the information when visual elements are thoughtfully incorporated.
So, you’re working on a killer blog post image guide? Great! To really drive engagement, consider targeting your audience on Facebook. Learning how to create custom audiences on Facebook can be a game-changer for your content visibility. create custom audiences facebook This will help you reach the perfect people who are interested in the topics you cover in your blog post guide, ultimately boosting your post’s reach and impact.
High-quality visuals, coupled with effective audience targeting, are a winning combination for any successful blog post.
Optimal Placement of Images
Images should be strategically placed to support the flow of information within the blog post. Ideally, images should be near the relevant text, either above or below it, minimizing cognitive load and making connections between the visual and the written content more immediate and intuitive. Placing images before the text discussing them can help the reader anticipate the upcoming information.
Positioning images directly after the corresponding text section reinforces the reader’s understanding and retention of the material.
Visual Breaks to Enhance Readability
Large blocks of text can be overwhelming for readers. Images are excellent tools for visually breaking up these dense sections. By strategically placing images at logical breaks, you can improve readability and maintain reader engagement. A photo, graphic, or illustration can provide a visual pause, making the information easier to digest.
Examples of Image Placement Strategies
- Before the paragraph: An image relevant to the upcoming paragraph can act as a preview, creating anticipation and making the following text more engaging.
- Within the paragraph: A smaller, relevant image within a paragraph can visually break up the text and help emphasize a particular point. For example, if you are discussing different types of flowers, a photo of each flower type can be placed alongside the descriptive text.
- After the paragraph: An image can serve as a visual summary or reinforcement of the concepts discussed in the previous paragraph. This helps readers consolidate their understanding of the material.
Highlighting Key Takeaways with Images
Images can be particularly effective in highlighting key takeaways or conclusions from the blog post. Using infographics, charts, or other visually compelling formats can encapsulate complex data or ideas in a succinct and memorable way. For instance, a chart summarizing the key findings of a research study can make the conclusions more impactful and memorable for the reader.
Positioning Images for Optimal Visual Appeal
| Image Placement | Description | Example |
|---|---|---|
| Above the Text | Excellent for introducing a concept or topic visually. | A photo of a bustling city could precede a discussion about urban development. |
| Below the Text | Ideal for summarizing or reinforcing the ideas presented. | A graph illustrating the growth of a company could follow a paragraph detailing the company’s strategy. |
| Within the Text | Effectively breaks up long paragraphs, improving readability. | A close-up image of a specific part of a machine alongside text explaining its function. |
| In a Side Column | Useful for highlighting related information or showcasing supplementary data. | A photo gallery of different project designs can be placed alongside a text detailing the project’s scope. |
Image Integration Best Practices
- Image Quality: Ensure images are high resolution and relevant to the content. Poor quality images detract from the overall impression of the post.
- File Size: Optimize image file sizes to prevent slow loading times. Large images can significantly slow down page load speed, negatively affecting the user experience.
- Accessibility: Include descriptive alt text for all images, which is crucial for accessibility purposes. It ensures that visually impaired readers can still understand the context of the image.
Responsive Image Considerations
Creating blog posts that look amazing on every device is crucial for a positive user experience. Modern readers browse across a wide range of screens, from massive desktop monitors to tiny mobile phones. Images are often a key component of a blog post’s visual appeal and conveying information. To ensure your images don’t get lost in translation or cause performance issues, understanding responsive image techniques is essential.Images that adapt seamlessly to different screen sizes are key to maintaining readability and engagement.
Optimizing image sizes and formats ensures a smooth browsing experience, regardless of the device being used. By considering these responsive design principles, you can avoid frustrating loading times and visual clutter, creating a more enjoyable reading experience for your audience.
Optimizing Image Sizes for Various Screen Resolutions
To ensure images render correctly across different screen resolutions, it’s vital to optimize their dimensions. Images that are too large for a specific device can slow down loading times and cause the page to appear cluttered. Conversely, images that are too small can appear blurry or pixelated. A balance is needed to ensure both visual quality and fast loading times.
This can be achieved through a combination of techniques, which are discussed below.
- Image Dimensioning: Use appropriate dimensions for each device type. For example, a high-resolution image suitable for desktop viewing might need to be scaled down to a more manageable size for mobile devices. This is crucial for keeping loading times quick. Tools and software can be used to precisely adjust image dimensions, ensuring a seamless experience across different devices.
- Image Format Selection: Different image formats have different strengths in terms of file size and image quality. Choosing the right format is vital for maintaining quality while keeping the file size manageable. JPEGs are ideal for photographs, while PNGs are better for graphics and images with transparent backgrounds. WebP, a more recent format, offers a balance between quality and file size, making it a strong contender for many images.
Responsive Image Techniques
Responsive image techniques allow images to automatically adjust their size and format based on the user’s device. This ensures that the images always appear sharp and clear, without sacrificing loading speed. Various methods can be used to achieve this.
- Using the `srcset` attribute: This attribute allows you to specify different image sources for different screen sizes. The browser automatically selects the image that best matches the device’s resolution. This method ensures that images are displayed at the optimal resolution for each user’s device.
- Using the `sizes` attribute: This attribute helps the browser determine the appropriate image dimensions for the user’s device. This attribute can be used in conjunction with the `srcset` attribute to provide even more granular control over image sizing and loading.
Table Demonstrating Image Formats for Different Devices
The table below illustrates how to select appropriate image formats for optimal display on various devices. Choosing the right format can greatly impact image quality and loading times.
| Device | Image Format | Rationale |
|---|---|---|
| Desktop | JPEG, WebP | High quality, large file sizes acceptable |
| Tablet | JPEG, WebP | Good balance of quality and file size |
| Mobile | JPEG, WebP, PNG | Prioritize smaller file sizes for faster loading; PNG for graphics/logos |
Avoiding Visual Clutter and Maintaining Performance
Using responsive techniques not only enhances the user experience but also improves site performance. Images that adjust dynamically to the screen size avoid visual clutter and improve loading speed, ensuring a more pleasant experience for the user. Employing these techniques can also increase user engagement and improve search engine optimization. Proper image optimization is key to creating a visually appealing and performant website.
Outcome Summary: Blog Post Image Guide
In conclusion, crafting visually engaging blog posts is more than just aesthetics; it’s about enhancing comprehension and reader engagement. This blog post image guide has provided a roadmap to selecting, editing, organizing, and integrating images effectively. By applying the principles Artikeld here, you can transform your blog posts from informative to truly captivating, leaving a lasting impression on your audience.